
In SQL Server Reporting Services, I prefer to store images external to the report file (as opposed to embedded). While this approach promotes reusability and easy change, it represents a slight challenge to viewing the images in both BIDS and Report Manager.
For use during development, I store the images within the SSRS Project in BIDS. For use after deployment, I centralize them within an Images folder in Report Manager.
It's important to me to be able to see the images while still in BIDS because we use conditional logic to display red or green indicators. If it were just a logo in a header, for instance, I'd be willing to accept the red X. In order to test that the proper indicator is being returned, I utilize the following approach.
First, upload an image to the project in BIDS. Right-click the Reports folder > Add > Existing Item. At the bottom right, change the drop down arrow from "Common Report Files" to be "All Files" instead. Browse to add the image file. Just to be a bit compulsive, I like to prefix all of my images with the word Image just so they're all grouped together within the SSRS Project.
When adding the image to the report (from the toolbox), switch the image source to be External (the default is Embedded). After External is selected, you'll be able to choose it from the drop-down menu.
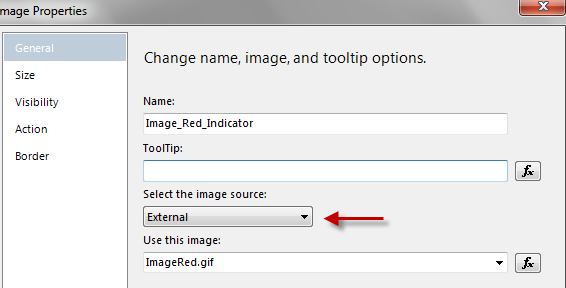
Just referring to the Image file like above in the drop-down will work while developing in BIDS. However, after the report is deployed, SSRS won't be able to find the file within the \Images folder in Report Manager. And if we explicitly refer to the \Images folder in the above path, we will have just removed our ability to see it properly within BIDS. So, let's utilize the function (fx) as follows:
=IIF(Globals!ReportServerUrl=Nothing,
Switch(
Fields!YTDAmount.Value = “NotAvail”,”ImageBlank.gif”,
Fields!YTDAmount.Value = “Yes”, ”ImageRed.gif”,
Fields!YTDAmount.Value = “No”, ”ImageGreen.gif”
),
Switch(
Fields!YTDAmount.Value = “NotAvail”,”/Images/ImageBlank.gif”,
Fields!YTDAmount.Value = “Yes”, ”/Images/ImageRed.gif”,
Fields!YTDAmount.Value = “No”, ”/Images/ImageGreen.gif”
)
)
First, the IIF statement checks the built-in Globals collection. If the ReportServerUrl returns Nothing, that means we are in the BIDS environment. So we refer to the image file name only (i.e., the equivalent of if we'd left the name in the drop-down).
When viewing the deployed report in Report Manager we will have a ReportServerUrl, so the Else section of the IIF applies. It is the same logic, just preceded with the folder name. Voila, it now works in both environments.
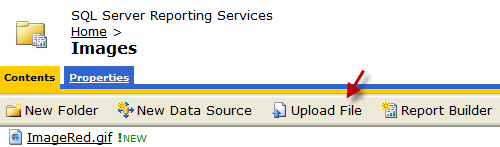
The last step is to upload the file within Report Manager. I usually leave this until last, just in case I've needed to tinker with the size of the image during report development. If you choose to deploy the images using BIDS, you'll need to *temporarily* change the TargetReportFolder within the Project Properties to be the Images folder. A safer alternative is to upload the image files from within Report Manager.
One minor disadvantage to storing the files in both BIDS and Report Manager is that if the image changes, a new copy will need to be uploaded to both the BIDS Project and Report Manager. However, that sure beats changing a lot of individual reports which had an image embedded in each report.