
We have a few reports which group the first column of data, then hide the detail rows when the report is initially displayed. This is a commonly used solution, and a really nice feature to conserve space on the page. However, by default SQL Server Reporting Services doesn’t provide the end user with a one-click option to “Expand All” or “Collapse All” of the grouped rows.
As an example, here is a very simple report which would require the end user to click 7 times in order to see the complete list.
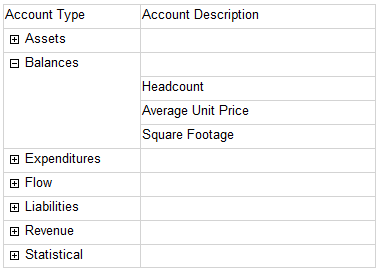
Much more than a couple of clicks can be a little annoying, particularly if the end user is in a hurry. In my opinion, too many clicks reduces the usability of a report & could prevent the end user from seeing something pertinent. For those reasons, I wanted to find a way to implement two buttons on the report: one button to ‘Expand All’ rows and one to ‘Collapse All’ rows.
Note: for purposes of this example, we are focusing on functionality & overlooking nice report formatting which I would normally do.
1. Create a new report. I'm calling mine AccountListByType.
2. Create a dataset, using AdventureWorksDW2008.
SELECT AccountType, AccountDescription
FROM DimAccount
WHERE AccountType <> ' '
3. Add a table to the body of the report. Add the AccountDescription field to the Details row. You may delete the 2nd and 3rd columns.
4. In the Row Groups pane, right-click the Details group and choose to Add Group > Parent Group. In the 'Group by' choice, select AccountType. Check the box to ‘Add group header.’ (If 2008 but not R2 yet: Change the column title to Account Type.)
5. If 2008 but not R2 yet: In the Row Groups pane, right click Group 1 and choose Group Properties. Rename it to Group_AccountType (because Group1 is not a very helpful name). Set the Sorting to be first on Account Type, then on Account Description.
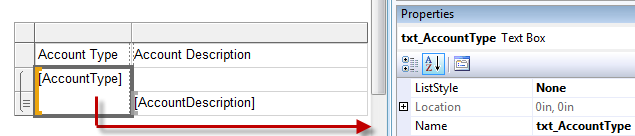
6. If 2008 but not R2 yet: On the report body, select the textbox with the grouped data. In the Properties pane, replace the Group1 Name with txt_AccountType. R2 will already have AccountType as the name - you may prefix it with txt if you'd like - I tend to do that & it's my cue that I've done something else, somewhere in the report with that textbox.
It's important to ensure the textbox name is descriptive because we are going to be using this textbox in a toggle property, so it’s helpful to use a good name.
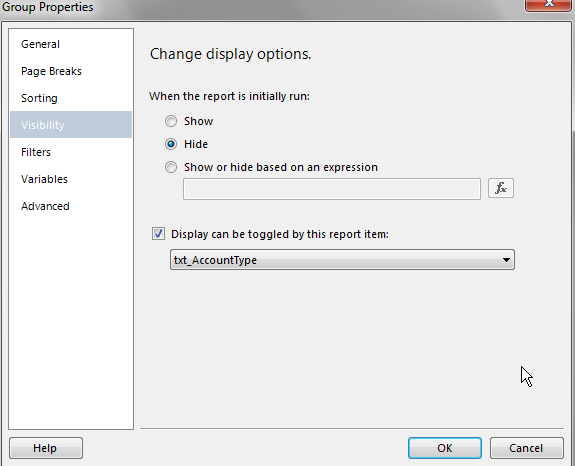
7. In the Row Groups pane, right-click the Details group and choose Group Properties. On the Visibility settings, choose the radio button to Hide the details. Check the box so that ‘Display can be toggled by this report item’ and select the txt_AccountType textbox we just renamed in the previous step.
8. Test the report here to ensure it runs properly. At this point we have the report created that was shown at the very beginning of this blog entry. Next comes the fun part.
9. Create a parameter called “ParamExpandOrCollapse” (or whatever fits your normal naming convention).
General
Prompt: None needed, as this will be hidden.
Data type: text.
Parameter visibility: hidden.

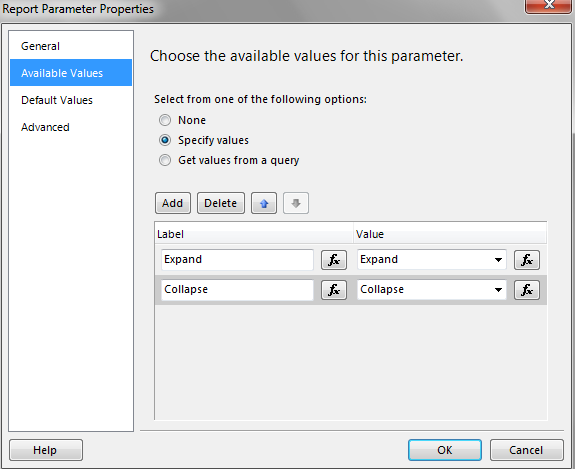
Available Values
Specify values works well for this situation.
Add two choices: one to Expand, and one to Collapse. The Label and Value may be the same.
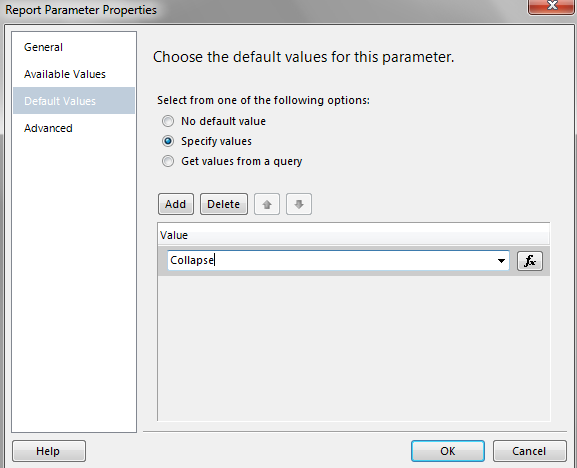
Default Values
Specify values works well for this situation.
Add the value Collapse as the default.
10. In the Row Groups pane, right-click the Details group and go to its Group Properties. On the Visibility settings, change the radio button from Hide to ‘Show or hide based on an expression.’ Enter the following expression:
=iif(Parameters!ParamExpandOrCollapse.Value = "Collapse", True, False)

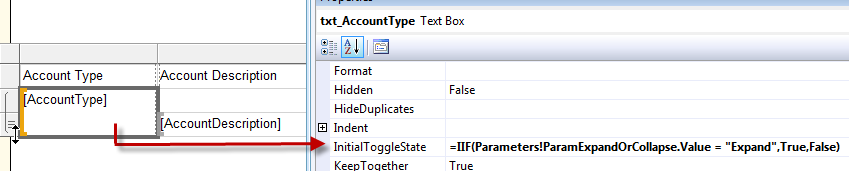
11. On the report, select the txt_AccountType textbox. In the Properties pane, set the Initial Toggle State property to the following expression. This will cause the + or – symbol to display correctly based upon the current parameter value.
=IIF(Parameters!ParamExpandOrCollapse.Value = "Expand",True,False)
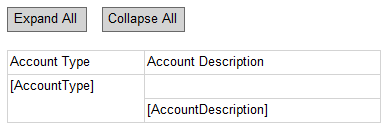
12. On the body, above the table, create two textboxes which will serve as our buttons - the the end user will interact with these buttons. (These two textboxes don’t really look like buttons so images would work better in a real life situation.)
13. Set properties for both of the buttons. This is where it all comes together. When the user clicks a button, a report Action will call the same report (i.e., this report is calling itself, rather than drilling through to another report which would be a more normal use of an Action). By using a report Action, we are able to set the parameter values.
Choice 1: Use a ‘Go to Report’ Action.
Following are the Action properties for the Expand All textbox, when Go to Report is the Action.
Specify a report: the same report we are currently working in.
Parameters to run the report: Name - ParamExpandOrCollapse. Value – Expand.

Do the same thing as above for the Collapse All textbox, with the Value being “Collapse” instead.
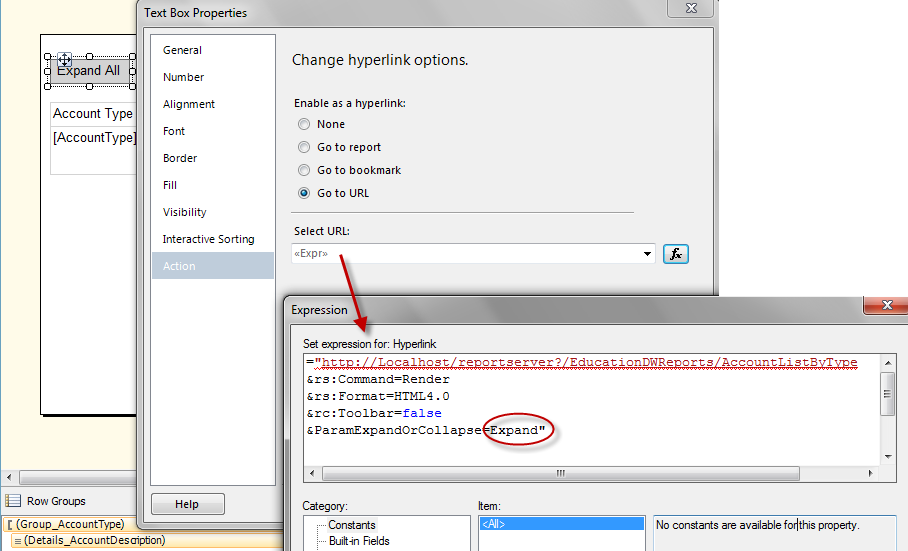
Choice 2: Use a ‘Go to URL’ Action.
Following are the Action properties for the Expand All textbox, when Go to URL is the Action.
="http://Localhost/reportserver?/EducationDWReports/AccountListByType
&rs:Command=Render&rs:Format=HTML4.0&rc:Toolbar=false&ParamExpandOrCollapse=Expand"
Do the same thing as above for the Collapse All textbox, with the parameter passed in the URL being “Collapse” instead.
That’s it. To my knowledge, we cannot access a property within SSRS to obtain the current toggle state, so we are making use of the parameter state instead. The key to making it all work is finding a method of setting the parameter without displaying the parameters pane. The report Action serves that purpose by setting the parameter state when the user clicks one of the buttons. In the first link below under References, Paul Turley mentions that the query is not re-executed which is good from a performance standpoint.
This idea could be expanded so that if you have several nested groups, where visibility for each is controlled by the above group, you could create different buttons that only expand a group at a time rather than everything on the entire report.
To make the buttons look nicer and perhaps take up less space, you probably should replace the textboxes with images. The sample Wrox report (see References below) uses an image and labels, which look really nice.
References: