Assigning Data Permissions for Azure Data Lake Store (Part 3)

Update Jan 6, 2019: The previously posted PowerShell script had some breaking changes, so both scripts below (one for groups & one for users) have been updated to work with Windows PowerShell version 5.1.

This is part 3 in a short series on Azure Data Lake permissions. 

Part 1 - Granting Permissions in Azure Data Lake
Part 2 - Assigning Resource Management Permissions for Azure Data Lake Store
Part 3 - Assigning Data Permissions for Azure Data Lake Store {you are here}

In this section, we're covering the "data permissions" for Azure Data Lake Store (ADLS). The ACL (access control list) grants permissions to to create, read, and/or modify files and folders stored in the ADLS service. Uploading and downloading data falls in this category of ACLs. If you come from the Unix or Linux world, the POSIX-style ACLs will be a familiar concept. 

There are two types of ACLs: Access ACLs and Default ACLs.

An Access ACL is the read/write/execute permissions specified for a folder or file. Every single folder or file has its security explicitly defined -- so that means the ADLS security model is not an 'inheritance' model. That is an important concept to remember.

A Default ACL is like a 'template' setting at a folder level (the concept of a default doesn't apply at the file level). Any new child item placed in that folder will automatically obtain that default security setting. The default ACLs are absolutely critical, given that data permissions aren't an inheritance model. You want to avoid a situation where a user has permission to read a folder, but is unable to see any of the files within the folder -- that situation will happen if a new file gets added to a folder which has an access ACL set at the folder level, but not a default ACL to apply to new child objects.

Tips for Assigning Data Permissions for ADLS

Organize your data lake folders and files so that folder-level security is one of the main considerations, and so that security is easier to manage.

Access to raw data is typically highly limited. This is partially due to lack of usability, and partially to ingest data as quickly as possible. Because every single file in ADLS has security properties specified, that is one of several reasons why a large number of very tiny files in ADLS is generally discouraged.

Typically in a data lake, the majority of users need only read+execute rights to consume the data. However, you may also have an area like a 'manual drop zone' or an 'analytics sandbox' where select users have write permissions to create, modify & delete folders and files. Generally speaking, write permissions in a data lake are minimal.

Be selective with granting permissions at the root level ("/"). It does minimize maintenance if you define an access ACL + default ACL at the root level, but only if you feel confident that is adequate security.

Try to use Azure Active Directory (AAD) groups whenever you can to grant access, rather than individual user accounts. This is a consistent best practice for managing security across many types of systems. This will reduce maintenance, and reduce the risk of inaccurate or out of date user permissions.

Currently the maximum # of ACLs that can be assigned to a file or folder is 32. This is another big reason to use AAD groups for managing access, rather than individual users.

Try to assign access at the folder level whenever you can. Although ADLS doesn't have a true inheritance model, you can set a 'default' entry which will handle new child items. 

Be aware that changing a default ACL on a folder doesn't automatically propagate to change the default ACL on any existing child folders. So, managing changes to existing data needs to be done carefully. Although it can seem like the default ACLs act like an inheritance model in some respects, it definitely is not.

Grant access to an AAD application (aka service principal identity or SPI) for automated operations, such as data loads. For service principals, you often can assign just the data permissions (the ACL) and not any permissions to the ADLS service (the RBAC). Check Part 4 for more discussion about service principals.

You almost always want to assign read + execute permissions together. The execute permissions allow a user to traverse the folder structure to where a file resides, which is needed in conjunction with the read (or write) permissions for the actual file.

The portal interface makes it easy to apply permissions to existing child-level folders and files. It's is a little harder to specify via scripting methods since your script will need to explicitly be set up to handle recursive operations. Therefore, try to assign relevant permissions as early as possible in your design/development/operationalization phase. 

When you set permissions on existing data, it can take a little while if you are asking it to recursively traverse the folders and files to set permissions for every object. This is another reason to try to set permissions at the AAD group level, rather than via individual users. 

The PowerShell cmdlets to manage ADLS changed in January 2018. See this post: Breaking changes to Azure Data Lake Store cmdlets

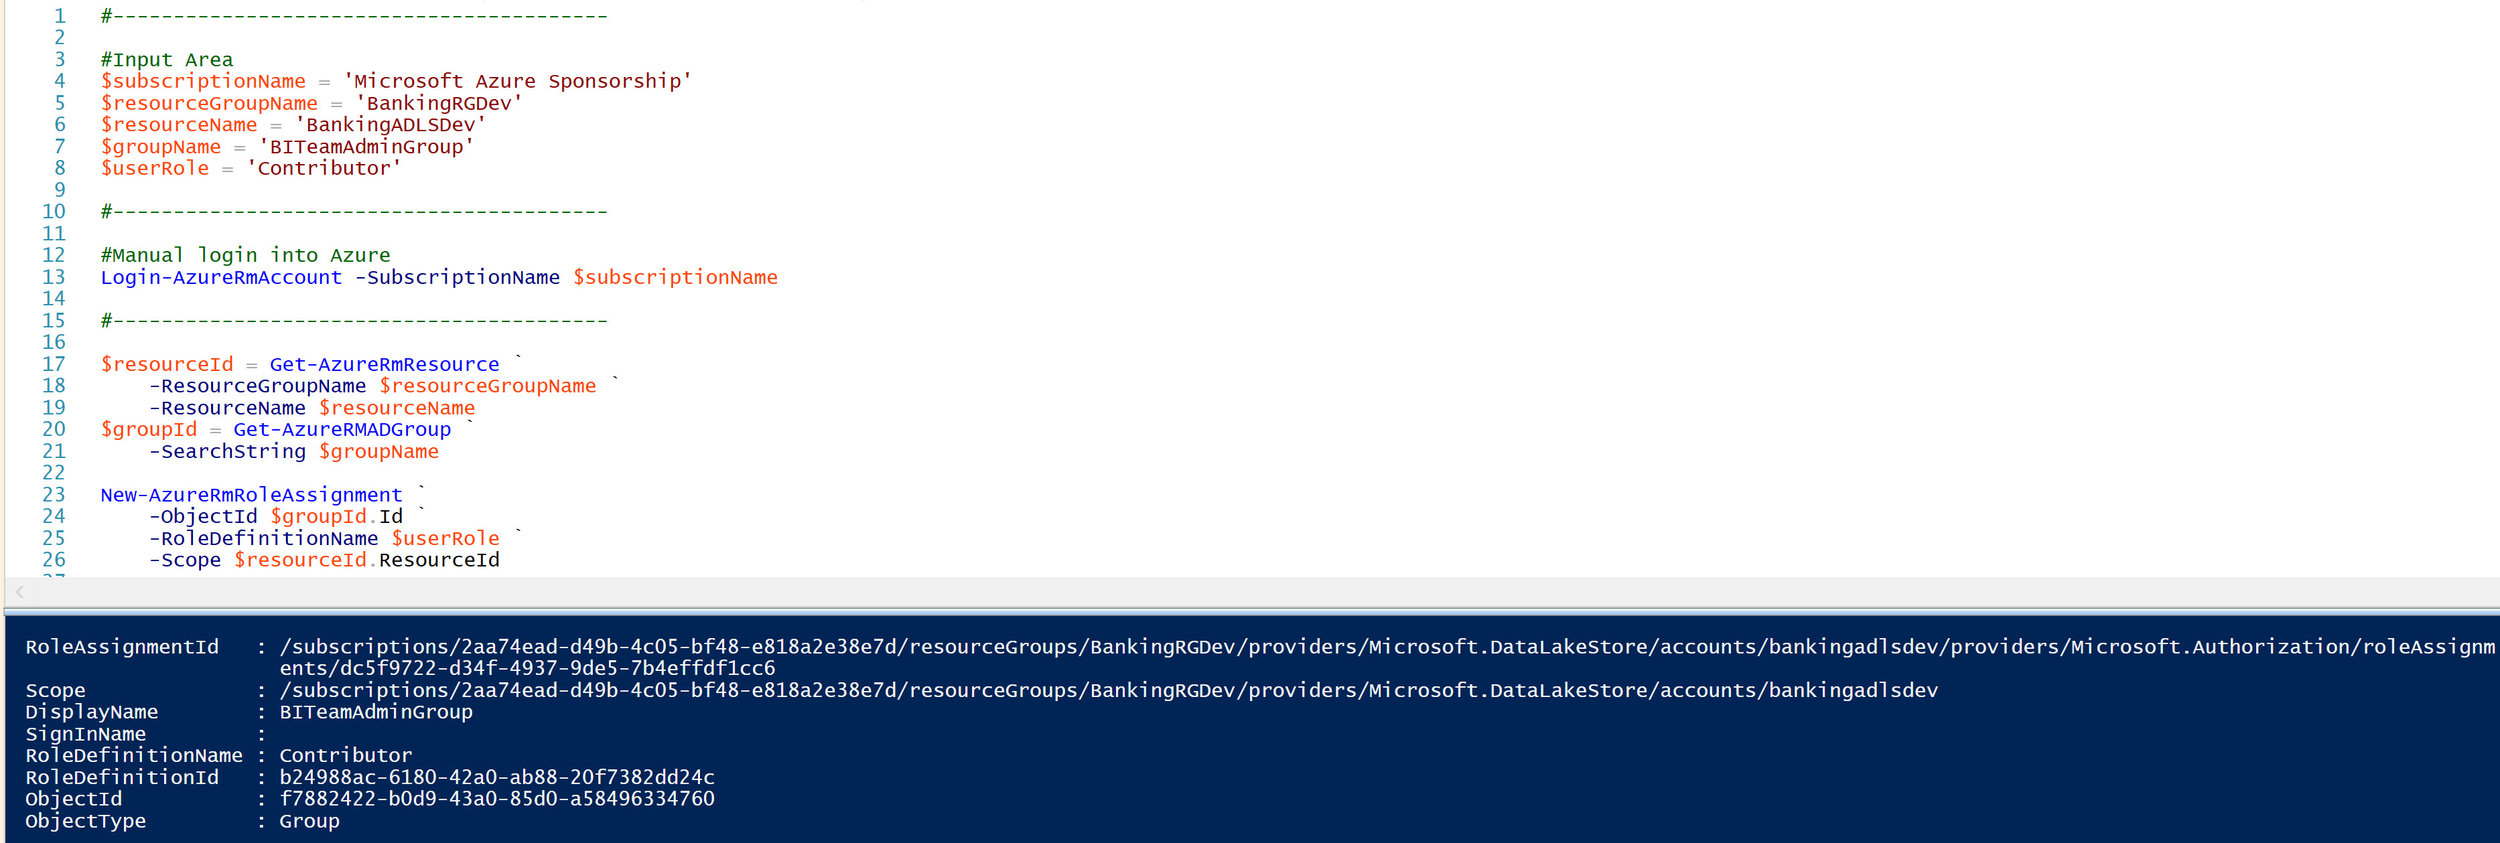
Defining ADLS Data Permissions in the Azure Portal

In my example, I want to assign read + execute permissions for the StandardizedData folder, but not for the RawData folder. In the portal, I open Data Explorer, navigate to the applicable folder which sets the "scope" for the permissions, then the Access button:

ADLS_ACL_Portal_1.jpg

Click the Add button to select a user or a group. Notice the permissions are read/write/execute. You can have the new permission entry add to all existing child folders & files (which you typically want to do). The last radio button is really important - this lets you set it as both an access entry *and* the default entry.

ADLS_ACL_Portal_2.jpg

Important! When using the web interface as shown above, you need to leave the blade open while it assigns permissions. If you navigate away and close it before it completes, the process will get interrupted.

Defining ADLS Data Permissions via PowerShell Script

The technique shown above in the portal is convenient for quick changes, for learning, or for "one-off" scenarios. However, in an enterprise solution, or a production environment, it's a better practice to handle permissions via a script so you can do things such as:

  • Promote changes through different environments

  • Pass off scripts to an administrator to run in production

  • Include permission settings in source control

The two scripts below (option 1 is for groups; option 2 is for users) are split into 4 sub-steps. You might not need all these steps (for instance, if you want to specify permissions at the root level rather than at a subfolder level which is done in the example below).

Important! Definitely make sure to assign the default entries as well as the access entries or you’ll run into problems (the default entries are part of step 4 below). If you were to accidentally set an access entry for a folder without any sort of default entry, new files which are added to the folder won’t have permissions (thus making the files ‘invisible’ to users).

Option 1 - Permissions at the Group Level (recommended)

#This script sets ADLS data-level permissions for one or more AAD groups.
#It is a basic ad hoc script (without error handling, etc).
#Script last tested with PowerShell version 5.1 on Jan 6, 2019.
#-----------------------------------------
#Input Area
#-----------------------------------------
$subscriptionName = 'Microsoft Azure Sponsorship'
$dataLakeStoreName =  'bankingadlsdev.azuredatalakestore.net'
$groupNameArray = @('DataReaderGroup','DataWriterGroup')
$adlsPermissionType = 'Group'
$adlsTraversePermission = 'ReadExecute'
$adlsPathPermission = 'All' #All = Read,Write,Execute
$adlsRoot = '/'
$adlsPath1 = '/ATMMachineData'
$adlsPath2 = '/ATMMachineData/StandardizedData'
#-----------------------------------------
#Manual login into Azure
#-----------------------------------------
#Login-AzureRmAccount -SubscriptionName $subscriptionName
#-----------------------------------------
#Step 1: Set root permissions to traverse
#-----------------------------------------
Write-Host '[*] Begin setting the root permissions to traverse (execute only).'
ForEach ($groupName in $groupNameArray)
    {
        $groupId = Get-AzureRmADGroup -DisplayName $groupName
        Set-AzureRmDataLakeStoreItemAclEntry  `
                -AccountName $dataLakeStoreName `
                -Path $adlsRoot `
                -AceType $adlsPermissionType `
                -Permissions $adlsTraversePermission `
                -Id $groupId.Id    
        Write-Host "[*] Complete setting root permissions for $groupName."
    }
#-----------------------------------------
#Step 2: Set parent folder permissions to traverse
#-----------------------------------------
Write-Host '[*] Begin setting parent folder permission to traverse (execute only).'
ForEach ($groupName in $groupNameArray)
    {
        $groupId = Get-AzureRmADGroup -DisplayName $groupName
        Set-AzureRmDataLakeStoreItemAclEntry  `
                -AccountName $dataLakeStoreName `
                -Path $adlsPath1 `
                -AceType $adlsPermissionType `
                -Permissions $adlsTraversePermission `
                -Id $groupId.Id    
        Write-Host "[*] Complete setting parent folder permissions for $groupName."
    }
#-----------------------------------------
#Step 3: Set ACLs recursively
#-----------------------------------------
Write-Host '[*] Begin setting the ACL (All permissions set recursively on all child items).'
ForEach ($groupName in $groupNameArray)
    {
        $groupId = Get-AzureRmADGroup -DisplayName $groupName    
        Set-AzureRmDataLakeStoreItemAclEntry  `
                -AccountName $dataLakeStoreName `
                -Path $adlsPath2 `
                -AceType $adlsPermissionType `
                -Permissions $adlsPathPermission `
                -Id $groupId.Id `
                -Recurse `
                -Concurrency 128
        Write-Host "[*] Complete setting ACLs for $groupName."
    }
#-----------------------------------------
#Step 4: Set default entries recursively
#-----------------------------------------
Write-Host '[*] Begin setting the default entry so any new items under this path will obtain the access.'   
ForEach ($groupName in $groupNameArray)
    {
        $groupId = Get-AzureRmADGroup -DisplayName $groupName  
        Set-AzureRmDataLakeStoreItemAclEntry  `
                -AccountName $dataLakeStoreName `
                -Path $adlsPath2 `
                -AceType $adlsPermissionType `
                -Permissions $adlsPathPermission `
                -Id $groupId.Id -Default `
                -Recurse `
                -Concurrency 128
        Write-Host "[*] Complete setting default entries for $groupName."
    }

Option 2 - Permissions at the User Level

#This script sets ADLS data-level permissions for one or more AAD users.
#It is a basic ad hoc script (without error handling, etc).
#Script last tested with PowerShell version 5.1 on Jan 6, 2019.
#-----------------------------------------
#Input Area
#-----------------------------------------
$subscriptionName = 'Microsoft Azure Sponsorship'
$dataLakeStoreName =  'bankingadlsdev.azuredatalakestore.net'
$userNameArray = @('WayneWriter@sqlchick.com','RayReader@sqlchick.com')
$adlsPermissionType = 'User'
$adlsTraversePermission = 'ReadExecute'
$adlsPathPermission = 'All' #All = Read,Write,Execute
$adlsRoot = '/'
$adlsPath1 = '/ATMMachineData'
$adlsPath2 = '/ATMMachineData/StandardizedData'
#-----------------------------------------
#Manual login into Azure
#-----------------------------------------
Login-AzureRmAccount -SubscriptionName $subscriptionName
#-----------------------------------------
#Set the data / POSIX/ ACL permissions
#-----------------------------------------
Write-Host '[*] Begin setting the root permissions to traverse (execute only).'
ForEach ($userName in $userNameArray)
    {
        $userId = Get-AzureRmADUser -UPN $userName 
        Set-AzureRmDataLakeStoreItemAclEntry  `
             -AccountName $dataLakeStoreName `
             -Path $adlsRoot `
             -AceType $adlsPermissionType `
             -Permissions $adlsTraversePermission `
             -Id $userId.Id   
        Write-Host "[*] Complete setting root permissions for $userName."
    }
Write-Host '[*] Begin setting the parent folder permission to traverse (execute only).'
ForEach ($userName in $userNameArray)
    {
        $userId = Get-AzureRmADUser -UPN $userName 
        Set-AzureRmDataLakeStoreItemAclEntry  `
             -AccountName $dataLakeStoreName `
             -Path $adlsPath1 `
             -AceType $adlsPermissionType `
             -Permissions $adlsTraversePermission `
             -Id $userId.Id    
        Write-Host "[*] Complete setting root permissions for $userName."             
    }
Write-Host '[*] Begin setting the ACL (All permissions set recursively on all child items).'
ForEach ($userName in $userNameArray)
    {
        $userId = Get-AzureRmADUser -UPN $userName
        Set-AzureRmDataLakeStoreItemAclEntry  `
             -AccountName $dataLakeStoreName `
             -Path $adlsPath2 `
             -AceType $adlsPermissionType `
             -Permissions $adlsPathPermission `
             -Id $userId.Id `
             -Recurse `
             -Concurrency 128
        Write-Host "[*] Complete setting root permissions for $userName."
    }
Write-Host '[*] Set the default entry so any new items under this path will obtain the access.'
ForEach ($userName in $userNameArray)
    {    
        $userId = Get-AzureRmADUser -UPN $userName
        Set-AzureRmDataLakeStoreItemAclEntry  `
             -AccountName $dataLakeStoreName `
             -Path $adlsPath2 `
             -AceType $adlsPermissionType `
             -Permissions $adlsPathPermission `
             -Id $userId.Id -Default `
             -Recurse `
             -Concurrency 128
        Write-Host "[*] Complete setting root permissions for $userName."
    }

Finding More Information

PowerShell Cmdlets for Azure Data Lake Store

Breaking Changes to Data Lake Store Cmdlets

Access Control in Azure Data Lake Store <--Definitely take time to read this

Secure Data in Azure Data Lake Store

Assigning Resource Management Permissions for Azure Data Lake Store (Part 2)

This is part 2 in a short series on Azure Data Lake permissions. 

Part 1 - Granting Permissions in Azure Data Lake
Part 2 - Assigning Resource Management Permissions for Azure Data Lake Store {you are here}
Part 3 - Assigning Data Permissions for Azure Data Lake Store

In this section, we're covering the "service permissions" for the purpose of managing Azure Data Lake Store (ADLS). Granting a role on the resource allows someone to view or manage the configuration and settings for that particular Azure service (i.e., although we're talking about ADLS, this post is applicable to Azure services in general). RBAC, or role-based access control, includes the familiar built-in Azure roles such as reader, contributor, or owner (you can create custom roles as well).

Tips for Assigning Roles for the ADLS Service

Setting permissions for the service + the data stored in ADLS is always two separate processes, with one exception: when you define an owner for the ADLS service in Azure, that owner is automatically granted 'superuser' (full) access to manage the ADLS resource in Azure *AND* full access to the data. Any other RBAC role other than owner needs the data access specifically assigned via ACLs. This is a good thing because not all system administrators need to see the data, and not all data access users/groups/service principals need access to the service itself. This type of separation is true for certain other services too, such as Azure SQL Database.

Try to use groups whenever you can to grant access, rather than individual accounts. This is a consistent best practice for managing security across many types of systems.

If you are using resource groups in Azure the way they are intended to be used, you may be able to define service permissions at the resource group level rather than at the individual resource level (although the example shown is here is setting RBAC for ADLS specifically). Managing permissions at the resource group level reduces maintenance, assuming your resource group isn't too broadly defined.

If you need to allow a user or group to be able to peruse data using the Data Explorer, then they'll need reader permissions to the ADLS Azure service. Basically, if any access to ADLS in the Azure portal is needed, or if managing the ADLS service (such as through ARM or PowerShell or the portal) is needed, then the appropriate RBAC entry is necessary. 

Typically, automated processes which do need access to the data (discussed in Part 3), don't need any access to the ADLS resource itself. In Part 4 we'll talk a bit about using service principals. I've found that frequently a service principal needs data access (ACLs), but not any RBAC access to the service.

The RBAC functionality is consistent across Azure services. When roles are updated for an Azure resource, it is recorded in the Activity Log:

ADLS_RBAC_ActivityLog.jpg

Defining RBAC Permissions in the Azure Portal

Setting up permissions can be done in the portal in the Access control (IAM) pane. (By the way, the IAM acronym stands for Identity and Access Management.)

ADLS_RBAC_Portal.jpg

Defining RBAC Permissions via PowerShell Script

The technique shown above in the portal is convenient for quick changes, for learning, or for "one-off" scenarios. However, in an enterprise solution, and for production environments, it's a better practice to handle permissions via a script so you can do things such as:

  • Promote changes through different environments
  • Pass off scripts to an administrator to run in production
  • Include permission settings in source control

Setting Permissions for a Group

In the following PowerShell script, we are assigning contributor permissions to an AAD group:

ADLS_RBAC_PowerShell.jpg

Here's a copy/paste friendly script from the above screenshot - for a group:

#-----------------------------------------

#Input Area
$subscriptionName = 'YourSubscriptionName'
$resourceGroupName = 'YourResourceGroupName'
$resourceName = 'YourResourceName'
$groupName = 'YourAADGroupName'
$userRole = 'Contributor'

#-----------------------------------------

#Manual login into Azure
Login-AzureRmAccount -SubscriptionName $subscriptionName

#-----------------------------------------

$resourceId = Get-AzureRmResource `
    -ResourceGroupName $resourceGroupName `
    -ResourceName $resourceName 
$groupId = Get-AzureRMADGroup `
    -SearchString $groupName

New-AzureRmRoleAssignment `
    -ObjectId $groupId.Id `
    -RoleDefinitionName $userRole `
    -Scope $resourceId.ResourceId 

Setting Permissions for a User

This next script is nearly the same, but this time we are assigning read+execute permissions to a user instead of a group (which should be the exception not the rule):

ADLS_RBAC_PowerShell_User.jpg
 

And, here's the copy/paste friendly version of the above screenshot - for a user:

#-----------------------------------------

#Input Area
$subscriptionName = 'YourSubscriptionName'
$resourceGroupName = 'YourResourceGroupName'
$resourceName = 'YourResourceName'
$userName = 'YourUserNameInEmailFormat'
$userRole = 'Contributor'

#-----------------------------------------

#Manual login into Azure
#Login-AzureRmAccount -SubscriptionName $subscriptionName

#-----------------------------------------

$resourceId = Get-AzureRmResource `
    -ResourceGroupName $resourceGroupName `
    -ResourceName $resourceName 
$userId = Get-AzureRmADUser `
    -UPN $userName 

New-AzureRmRoleAssignment `
    -ObjectId $userId.Id `
    -RoleDefinitionName $userRole `
    -Scope $resourceId.ResourceId 

The online examples for the New-AzureRmRoleAssignment cmdlet enumerates the IDs or GUIDs, which makes things clear for learning but isn't ideal for operationalized scripts. Therefore, the purpose for $resourceId and $groupId above is to do the work of looking up the GUIDs so you don't have to do that manually.

Personally, I like using PowerShell instead of ARM (Azure Resource Manager) templates for certain things, such as permissions, but you do have additional options beyond what I've discussed here based on what you're most comfortable with.

Finding More Information

Get Started with Role-Based Access Control in Azure


Granting Permissions in Azure Data Lake

This purpose for this set of posts is to share some tips & scripts for setting permissions for Azure Data Lake. This content is split up into a short series:

Part 1 - Granting Permissions in Azure Data Lake {you are here}
Part 2 - Assigning Resource Management Permissions for Azure Data Lake Store
Part 3 - Assigning Data Permissions for Azure Data Lake Store

Overview of Permissions in ADLS

There are two parts to how permissions work in Azure Data Lake Store:

ADLS_Permissions.jpg
 

(1) RBAC permissions to the ADLS account itself, for the purpose of managing the resource.
RBAC = Role-based access control. RBAC are the familiar Azure roles such as reader, contributor, or owner. Granting a role on the service allows someone to view or manage the configuration and settings for that particular Azure service (ADLS in this case). See Part 2 for info about setting up RBAC.

(2) ACL permissions to the data stored in ADLS, for the purpose of managing the data.
ACL = access control list. The ACLs grant read/write/execute permissions on the data itself. Granting permissions here allows someone to create, read, and/or modify files and folders (i.e., the actual data) stored in ADLS. If you come from the Unix or Linux world, the POSIX-style ACLs will be a familiar concept. See Part 3 about setting up ACLs.

Finding More Information

There is quite a bit more to know about ADLS security than what is covered in this series, so be sure to also dive into the official documentation links:

Security in Azure Data Lake Store

Access Control in Azure Data Lake Store

Securing Data in Azure Data Lake Store

Best Practices for Using Azure Data Lake Store

Data Refresh Issues in the Power BI Service Due to Invalid Dates

Last week I got involved with a customer issue. A refresh of the data imported to a PBIX always works in Power BI Desktop, but the refresh operation intermittently fails in the Power BI Service. Their workaround had been to refresh the PBIX in Desktop and re-upload the file to the Service. This post is about finding and fixing the root cause of the issue - this is as of March 2018, so this behavior may very well change in the future. 

Turns out, the source of the problem was that the customer's Open Orders table can contain invalid dates - not all rows, just some rows. Since Open Orders data can fluctuate, that explains why it presented as an intermittent refresh issue. Here's a simple mockup that shows one row which contains an invalid date:

InvalidDates_SQLTable.jpg
 

At this point, we have two open questions:
(1) What is causing the refresh error? 
(2) Why is the refresh behavior different in the Service than the Desktop tool?

What is Causing the Data Refresh Error?

The thing that made it difficult to figure out is that the error message in the Service indicated a different table every time - there were about 15 tables in this data model. Since the error wasn't specific, uploaded tables one by one to the Service to determine which table actually was causing the error. When there is just one table present, the error message is helpful, indicating it's not a legal date:

InvalidDates_PowerBIErrorMessage.jpg
 

If Microsoft is able to make the above error message display even when there are numerous tables, that would be extremely helpful. Ok, at this point we know it's a date issue. Which brings us to the next question...

Why is the Refresh Behavior in the Power BI Service Different than Desktop?

The customer had opened a ticket with Microsoft, and the support person provided this information:

"The code path is slightly different between the Desktop and the Service:
-In the Desktop, the query runs through an OLEDB-based provider and the conversion from CLR date to OLE date is handled by our own code (and the faulty value is silently replaced by NULL). 
-In the Service, the query runs through an ADO.NET-based provider and the conversion from CLR date to OLE date is handled by another layer which does not swallow the error but bubbles it out."

So, at this point in time (March 2018), the date conversions are handled differently in the Power BI Service, and the Power BI Service is not tolerant of an invalid date. The invalid dates in my customer's Open Orders table looked mostly like this: 0018-03-01 or 0017-01-01. Year "18" and year "17" are less than the minimum year of "101" allowed by the Power BI Service.

Options for Handling Invalid Dates to Avoid Refresh Failure

Option 1: In the Source Database. It's always best to handle data quality issues as far upstream (i.e., close to the source) as possible. In my customer project, I was fortunate to have the ability to modify the underlying Open Orders database view where Power BI accesses the data:

CREATE VIEW DW.vwOpenOrders
AS
SELECT 
   Column1
  ,Column2
  ,Calendar_Date = CASE WHEN LEFT(CONVERT(CHAR(10), Calendar_Date), 2) IN('19','20') THEN Calendar_Date ELSE NULL END
FROM DW.OpenOrders
WHERE...

The reason I strongly prefer to handle it in the source database is because it's resolved *once* then *all* downstream queries and tools (like Power BI) can take advantage of it.
  
Option 2: In the Power BI Query Editor. Alternatively, you could do something like this in your M script (this Table.TransformColumns snippet was provided by the Microsoft support team):

InvalidDates_FixingInPowerBI.jpg

The Custom1 step above finds any date or datetime column in the entire query and, if it's less than the year 101, changes the date to 01/01/1900 (you could change it to a null if you want, but null dates and attributes aren't ideal in reporting scenarios). Since the M script traverses all columns in the query, you'll want to check performance if you have a large set of data.

Now, just to reiterate...although handling it inside of Power BI Desktop is an option if you cannot change the underlying source, I would far prefer to handle it upstream in the database as shown in Option 1. Having said that, here is the text from the above image so you don't have to type it:

let
  Source = Sql.Database("servername.database.windows.net", "AdventureWorksLT"),
  dbo_DateTableTest = Source{[Schema="dbo",Item="DateTableTest"]}[Data],
  Custom1 = Table.TransformColumns(
    #"dbo_DateTableTest", 
    List.Transform(
        Table.ColumnsOfType(#"dbo_DateTableTest", {type date, type nullable date, type datetime, type nullable datetime, type datetimezone, type nullable datetimezone})
        , (name) => {name, (date) => if date = null or Date.Year(date) < 101 then #date(1900, 01, 01) else date, Type.TableColumn(Value.Type(#"dbo_DateTableTest"), name)}
        )
    )
in
#"Custom1"

Hope this post is helpful if you find yourself dealing with date-related data refresh errors in the Power BI Service.

You Might Also Like...

Reusing Datasets Imported to the Power BI Service

Why the Default Summarization Property in Power BI is So Important