Creating a SharePoint Server Farm in Azure - Part 2

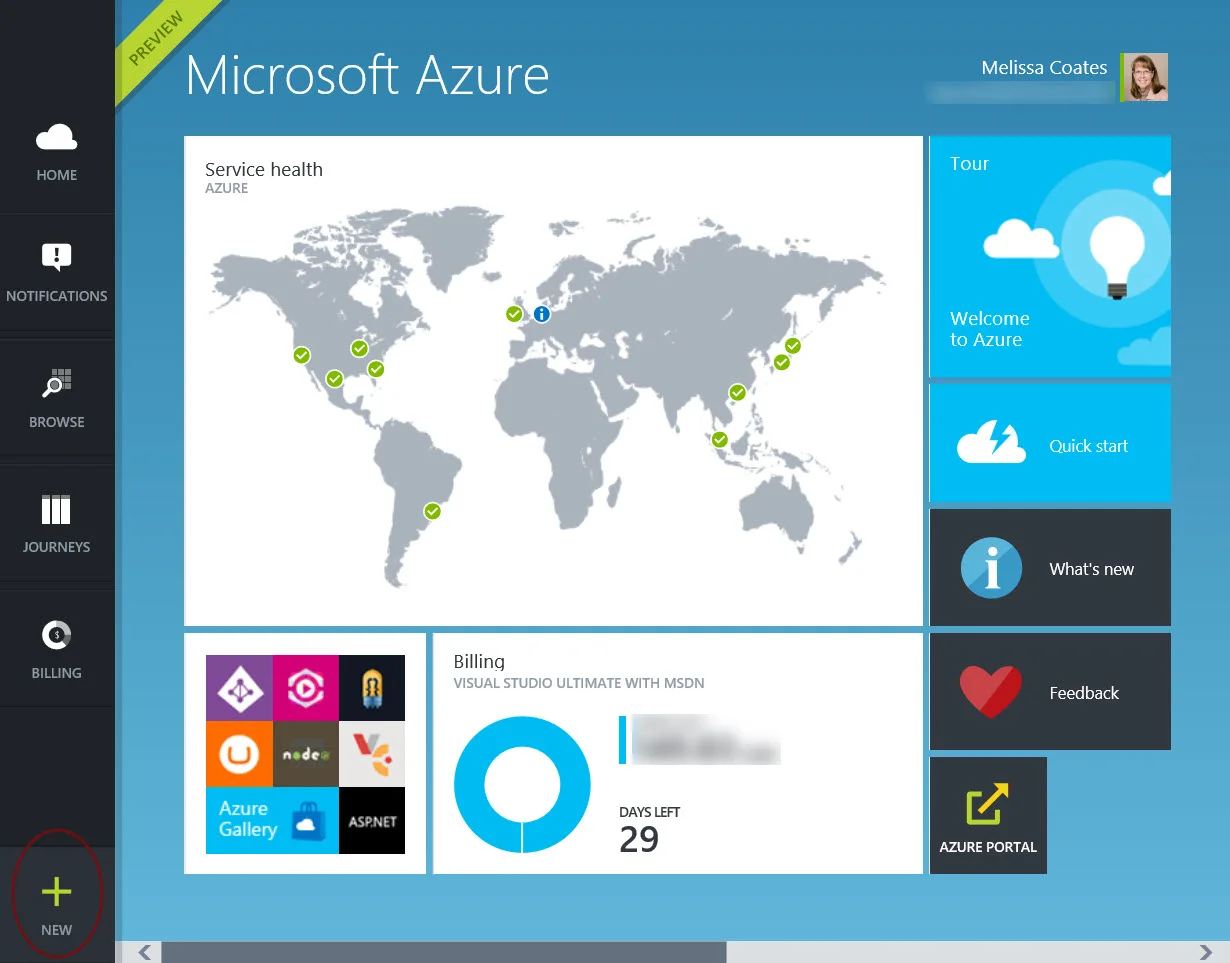
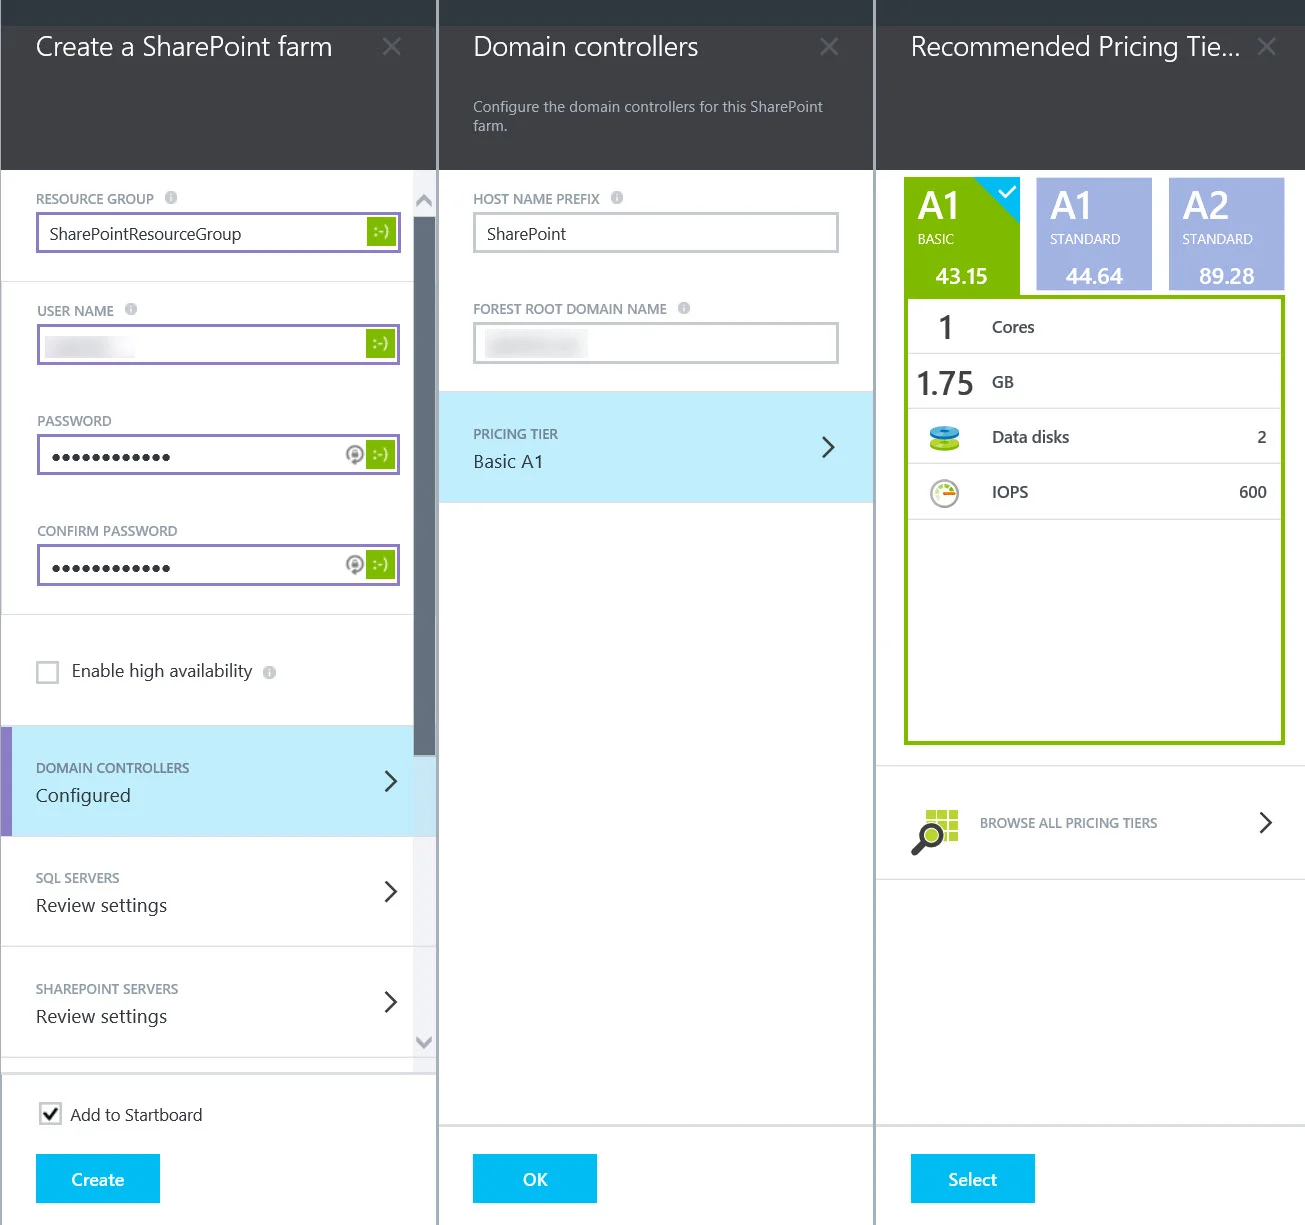
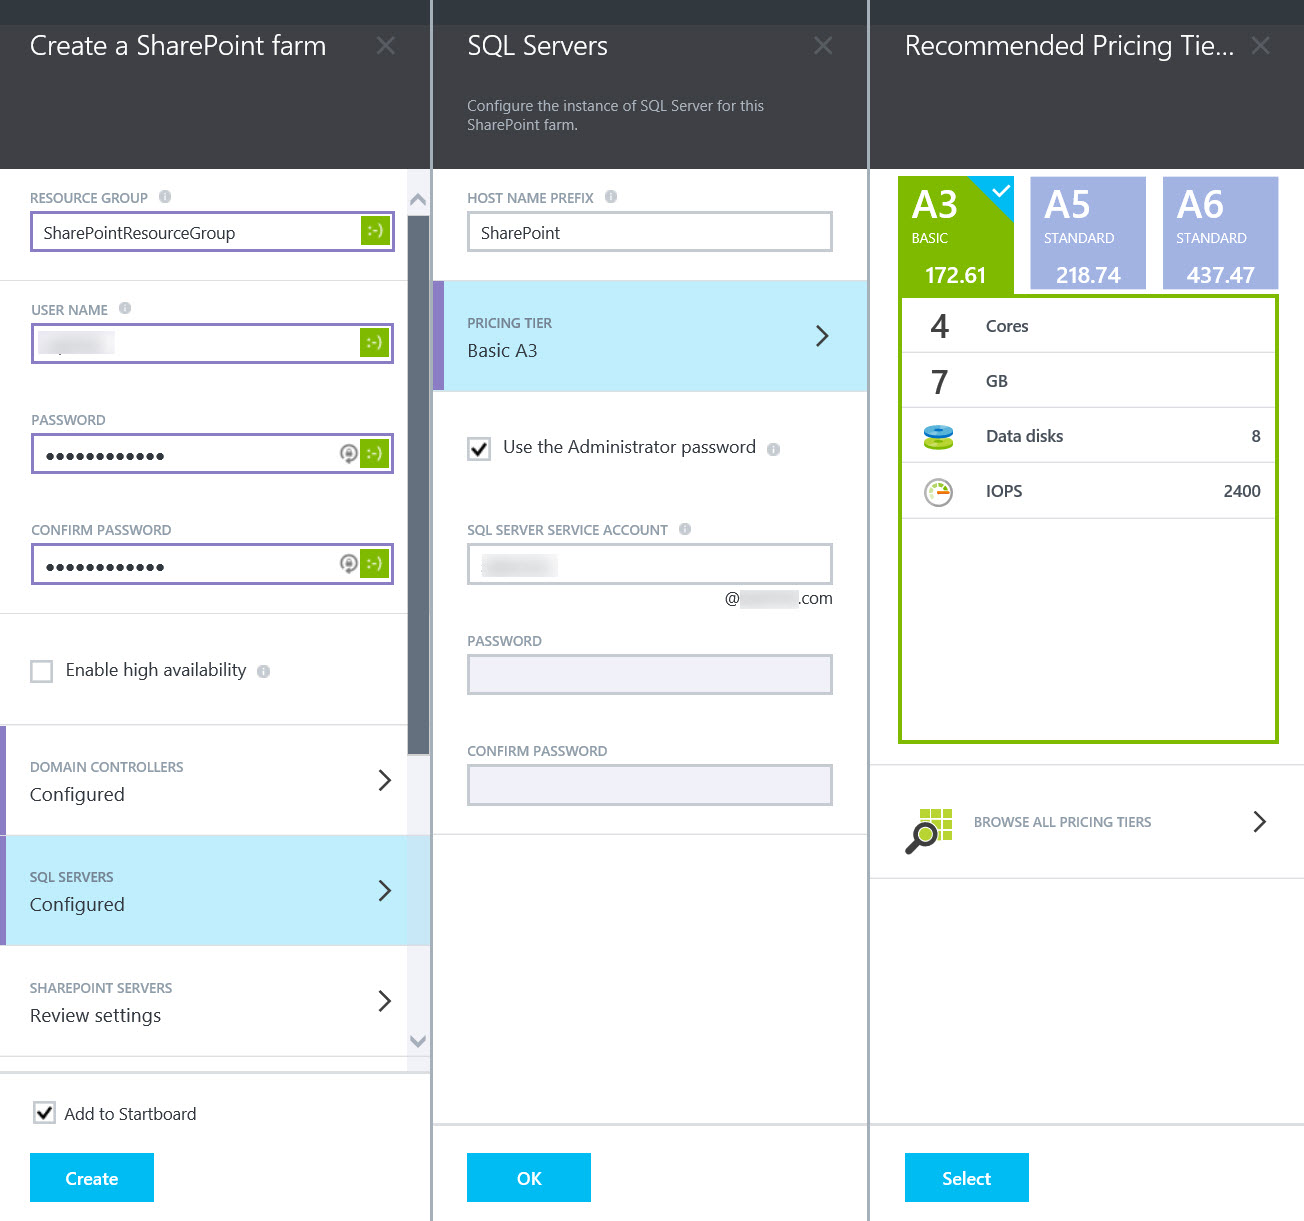
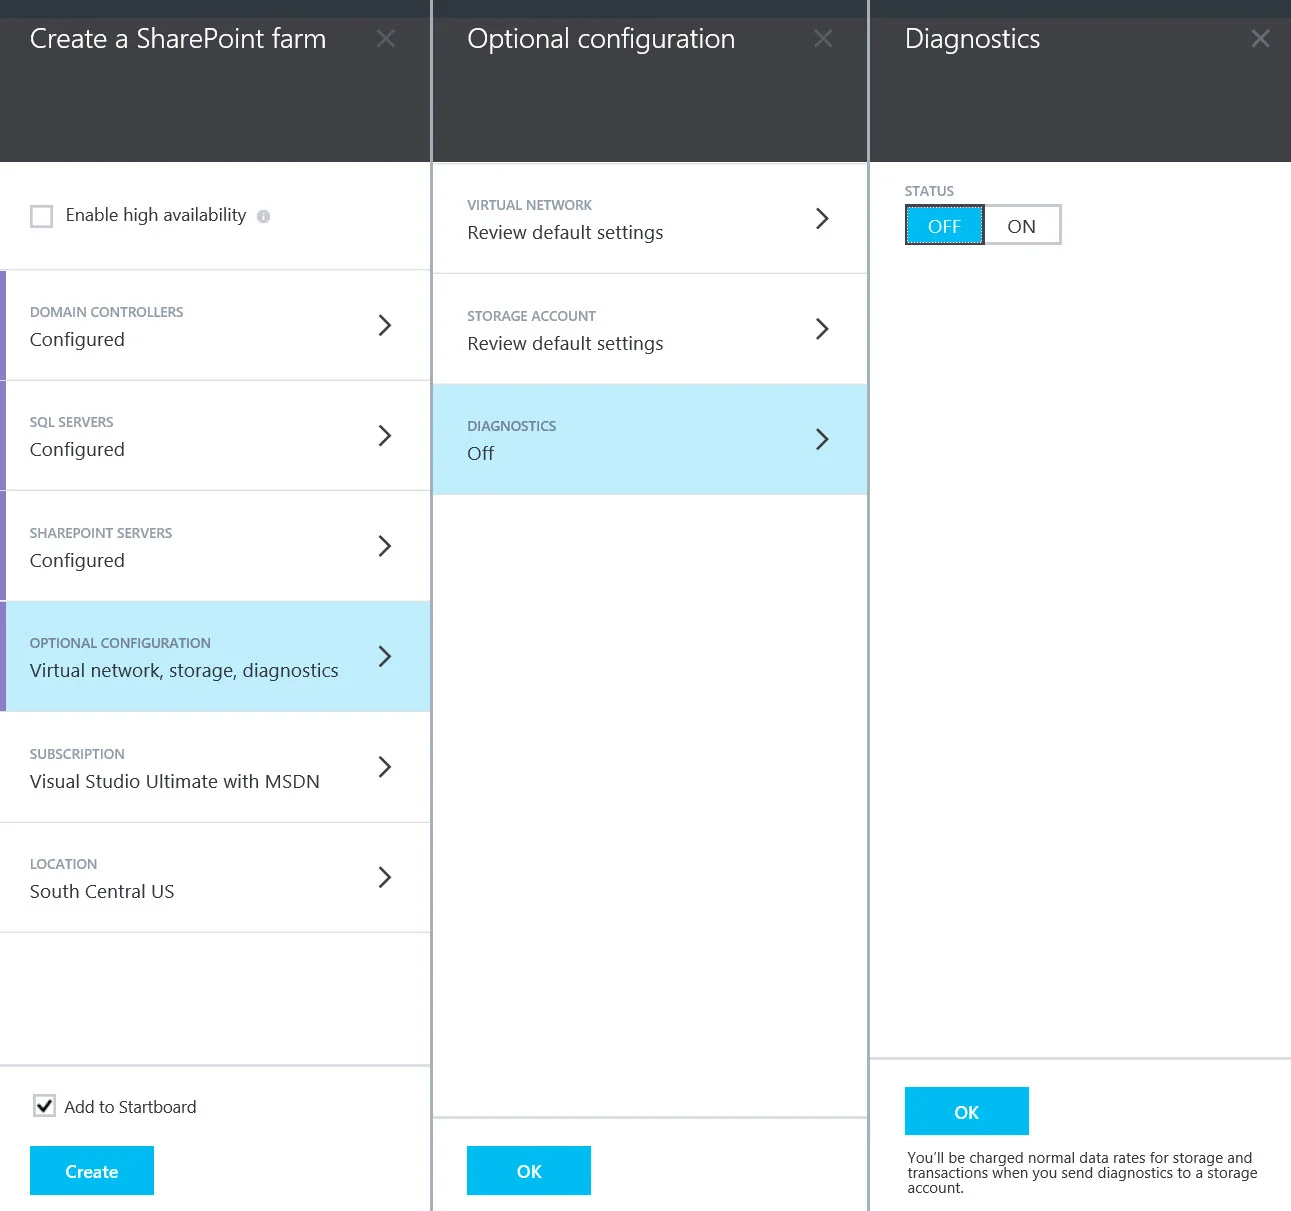
In Part 1 of Creating a SharePoint Server Farm in Azure, we went through the screen shots and steps available for using the gallery resources available in Azure for setting up a SharePoint Farm. In Part 2, we're going to look at the next steps to determine the state of this new environment.

When we created the farm in Part 1, there were not any options for what services, apps, or functionality to be pre-configured. That makes sense since this is an IaaS environment, not PaaS. So what we have at this point is SQL Server 2014 installed on the SQL VM which is running Windows Server 2012 R2.  A SharePoint site ready to be configured on the SharePoint VM which is running Windows Server 2012. 

As a reminder, this is a demo environment for me so some of the settings are reflective of that and may not be consistent with what you would want to do in a production environment.

Pin the Resource Group to the Startboard

The first thing you'll want to do is pin your new resource group to the Startboard.  When it's done being configured, you should see a Notification.  Selecting the notification will open the resource group. Right-click the tile on the Startboard and pin it for easy access later.

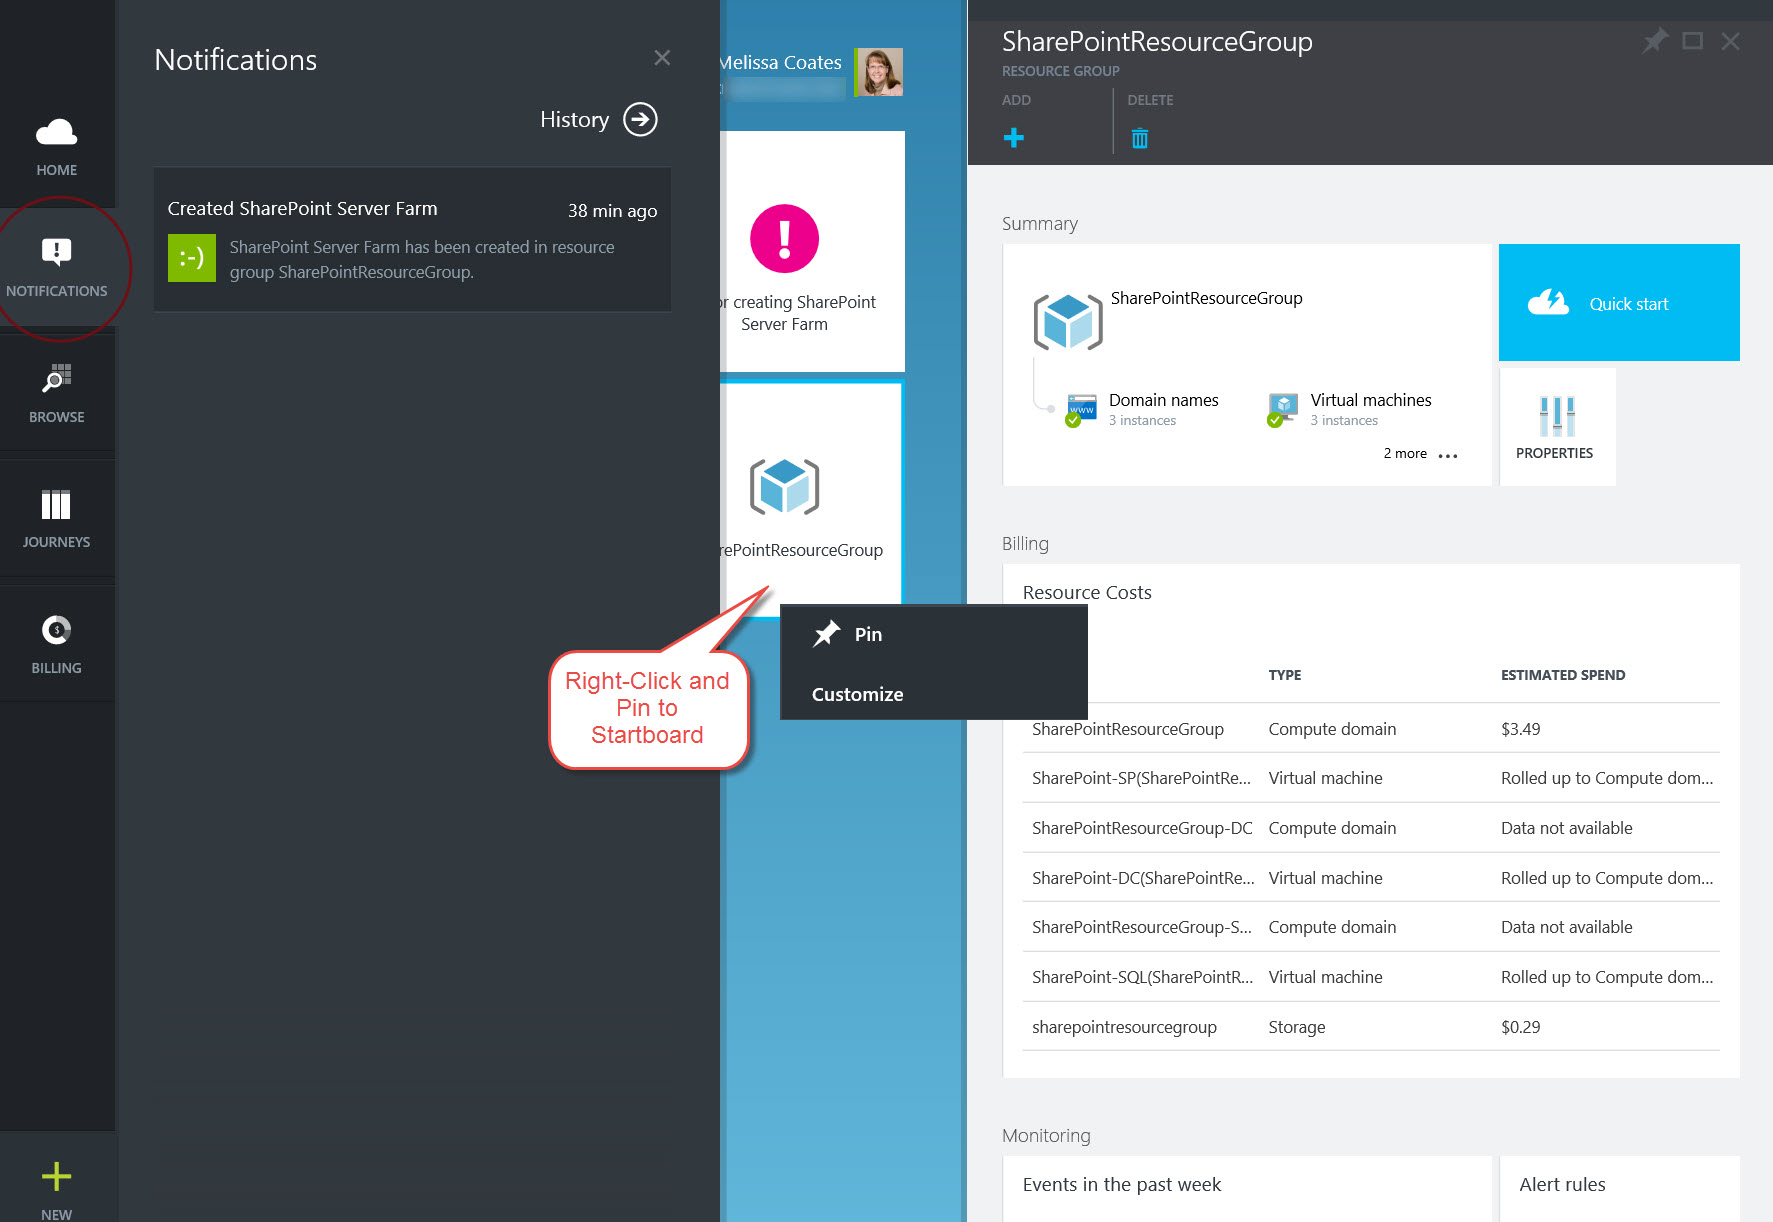
Reviewing Details of the Resource Group

On the blade for the Resource Group, select the 2 more ... ellipses. That'll expand out to another blade which lists each individual resource.

Let's take a look further at the SharePoint VM.  Selecting that resource displays another blade out with more details about it + links to take further actions.

Connecting to the Virtual Machine

Now I'm ready to connect to one of the virtual machines. To connect, there's a button at the top of the blade for the virtual machine. (Note this is also where you can shut down, start, & restart the services. Since this is a demo environment for me, I'll be shutting down the VMs when they're not in use.)


After clicking the Connect button you'll be presented with a Open/Save/Cancel dialog from the browser.

What I usually do, because I'm far too lazy to come into the Azure portal and connect every time, is do a Save.  Where I choose to save it is a folder on my desktop called RDP which has various connections with their preferences saved.

In Windows Explorer, right-click the RDP file you just saved and choose Edit. There's 2 main things I'm interested in changing.  One is the pixel size for the monitor (on the Display tab). The other is under Local Resources; click the More button and choose all the checkboxes - especially drives. It's really helpful to get to your local drive when in a VM.  (Sidenote: I often need to edit the file with a text editor instead to get the pixel size exactly right. I talked about that a bit more here:  How to Perfect the Resolution of a Remote Desktop Session.)

When you're done, before you hit Connect, don't forget to click the Save button on the General tab. That'll save these preferences for the next time you launch the RDP session from your saved file.


Now let's connect to the virtual machine. When prompted, use the administrator ID and PW (i.e., the you provided on the "Create a SharePoint Farm" blade during setup).

Add Central Admin Shortcut to Desktop

Call me finicky, but the first thing I really want to do is get the shortcut to Central Admin placed on the desktop of my SharePoint VM. So let's bring up the Start menu from the lower left hand corner.

On the Start menu, Central Admin isn't set to appear there yet. So let's right-click and go to All Apps.

Locate the Central Administration tile.  Right-click once and choose Pin to Start.  Then right-click again and choose Open File Location.

Now we have a window where the shortcut is located. Let's right-click to copy it, and then paste it on the Desktop so it's handy for future use.

WindowsServer2012CentralAdminShortcut.jpg

Now after all that we are ready to launch Central Admin and see what we've got!  It'll take it a bit of time to fire up because it's doing its just-in-time compiling thing.

In Central Admin, let's take a look at the web applications.  Click the "Manage web applications" hyperlink under Application Management.

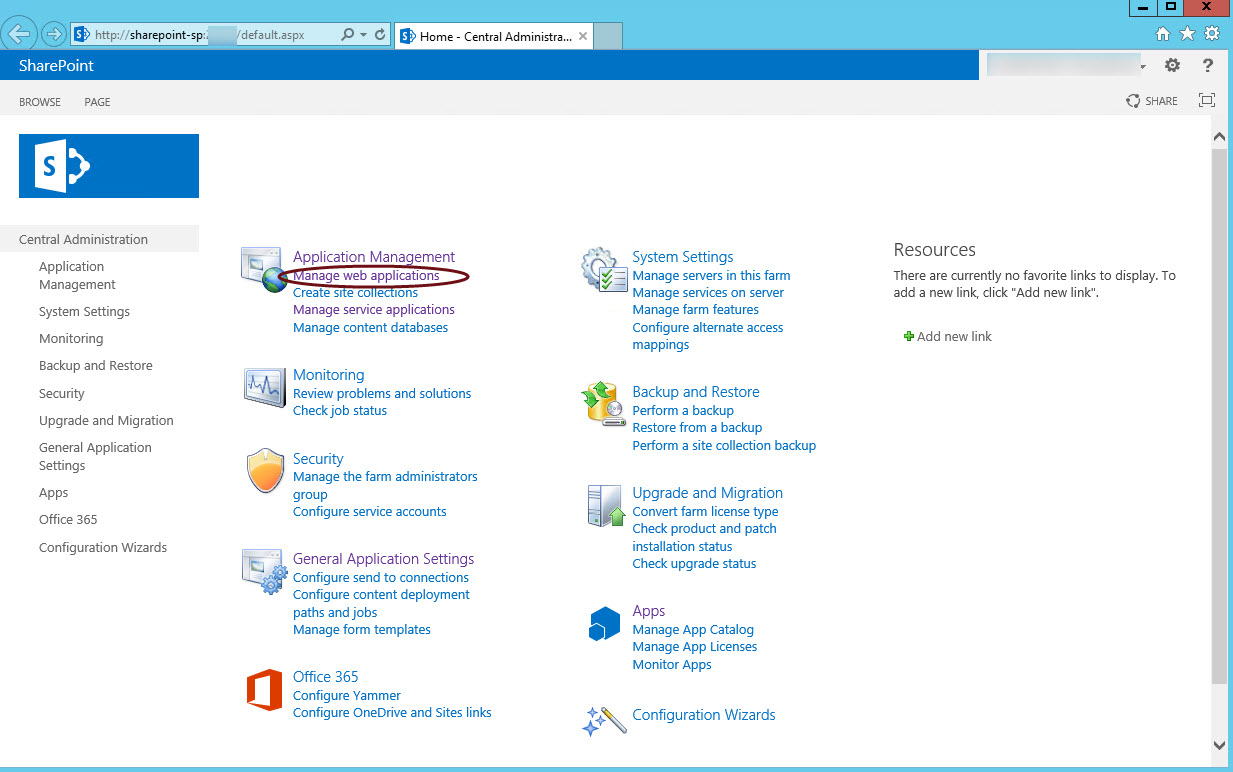
On the web applications page, we'll see two addresses. One is our default URL, and the other is for Central Admin.

CentralAdmin_WebApps.jpg

When we launch the default address, we are presented with a template selector. Your choice will depend, of course, on what you want to do with the site.  I'm going to choose the BI Center template.

AzureTemplateSelector.jpg

The other thing you can do to check out the SharePoint environment initially is to go to Site Contents. There's a link for it on the left-side menu.

At this point you are ready to install and configure the SharePoint services and database instances you need for this environment. If you're interested in a BI environment, check out some of the suggestions here:  Resources for Installing and Configuring BI with SharePoint 2013 and SQL Server 2012.  (Even though the links in that blog entry all relate to on-premises installations, the majority of the information will still be relevant in Azure since this is an IaaS type of situation.) 

Creating a SharePoint Server Farm in Azure

This morning at the Worldwide Partner Conference, the new SharePoint Server Farm in Azure was announced. As a BI developer with limited experience with administration and configuration, this option to fire up a multi-server SharePoint Farm in Azure piqued my interest.

Below is Part 1 my experience setting up the farm in Azure. (Perhaps this will prove to my husband that I'm not really playing Farmville as he seems to suspect!)  These steps assume you already have an Azure account created - if you don't, start here https://account.windowsazure.com/Home/Index first.

Part 2 is continued here:  Creating a SharePoint Server Farm in Azure - Part 2.

Finding the Link to Create a SharePoint Farm in Azure

Initially I thought maybe it wasn't available publicly yet because I could not find the correct choice when choosing New > Virtual Machines in Azure. That's because it's available in the new Azure Portal that's in preview mode currently.  Turns out that's because, among other things, the new Azure Portal has new capabilities to manage multi-tier applications using a Resource Group

First, click your ID at the top right of the browser window and choose "Switch to new portal." 

This launches a window for the new Azure Portal which is addressed like this: https://portal.azure.com/<YourAccount> and you will be logged out of the old portal.

Now we want to click the New button at the bottom left of the main page.

At this point since it's new, the SharePoint Server Farm is listed right away. However, let's go "the long way" just for fun.  Next click the Everything arrow.

Now we're looking at the gallery of resources that can be created in Azure. (Note that if you have the Gallery pinned to your Startboard, i.e., the home page in the new Azure Portal, you could have gotten to this point that way too.)

Select Virtual machines from the Gallery menu and locate SharePoint Server Farm in the list.

Creating a New SharePoint Farm in Azure

After you've clicked on the link for SharePoint Server Farm, its "blade" slides out to the right. From here you can take a look at the useful links they've posted and when you're ready hit Create.

At this point we get one more blade to slide out to the right which is where all the options are.

Options in Azure When Creating a SharePoint Farm

Resource Group

This creates a new Resource Group which will contain all related resources so they can be managed together. I'll name mine SharePointResourceGroup.

Choose this name carefully especially if you're not going to be using a custom domain name. Because of this choice, the URL address for my default web application is SharePointResourceGroup.cloudapp.net/. There are, however, options to manage the domain name in Azure.

User Name and Password

This will be your initial domain & local administrator. This is not your Microsoft account or Organizational account; it's just a user ID without the @company.com.

Domain Controllers

Here you set a Host Name Prefix (default = SharePoint), your Forest Root Domain Name (default = contoso.com), and choose a Pricing Tier (default = Standard A1) for the domain controllers.

I have left the Host Name Prefix at its default of SharePoint. I've also set a Domain Name and adjusted the pricing tier for the DC down to Basic A1 because this is just a demo for my personal use.  My demo doesn't need redundancy so I left the High Availability checkbox unchecked - normally you want to check this as that's a great built-in feature of Azure. 

SQL Servers

Here you have options for selecting a Host Name Prefix (default = SharePoint), a Pricing Tier for the SQL Servers (default = Standard A5), and the password for the service account.

This Host Name Prefix here defaults to SharePoint, even if you selected a different prefix for the domain controllers in the earlier configuration step. I've kept mine using SharePoint for consistency.

The default pricing tier of A5 includes 4 data disks, 2 cores, 14 GB of memory, and currently costs about $218.74 a month.  (Check here for Azure pricing.) Since mine is a demo, I'll scale it back to a basic plan since I don't need load balancing and auto-scaling. Most companies setting this up for anything other than trivial use like my demo will need beefier SQL Server specs.

The "Use the Administrator password" is asking if you want the service account to use the same password as the User Password that was specified on the first blade "Create a SharePoint Farm." For normal business operations, this would be no but for my demo purposes I've left this option checked.

Lastly, you specify what the name for the SQL Server Service Account will be for running the MSSQLSERVER and SQLSERVERAGENT services. This is in the format of <ServiceAccountName>@<DomainName>.com. The @<DomainName> uses the Forest Root Domain Name that was specified in the Domain Controllers section.

SharePoint Servers

In this blade you set another Host Name Prefix (default = SharePoint), Pricing Tier for the SharePoint Servers (default = A2), and two domain accounts.

As with the previous two sections, I kept the Host Name Prefix as SharePoint for consistency.

The "Use the Administrator password" is asking if you want the two new service account to use the same password as the User Password that was specified on the first blade "Create a SharePoint Farm." For normal business operations, this would be no but for my demo purposes I've left this option checked. If you choose to set individual passwords, you'll also need to set a pass phrase which will be used to join other machines to the farm.

The Setup User Account is the domain account that will be used to execute the SharePoint setup operations. The Server Farm Account is a domain account which will be used to configure and manage the SharePoint server farm, act as the application pool identity for Central Administration, and run the SharePoint timer service.

Optional Configuration:  Virtual Network

Under Virtual Network, the options are a Name (default = the Resource Group name) and Address Space CIDR Block (default = 10.0.0.0/26).

Optional Configuration:  Storage Account

For the Storage Account, the default is to create a new storage account. Or, you can connect to an existing storage account. The default name for a new storage account is <ResourceGroupName>.core.windows.net.

You can also set a Pricing Tier for the storage account. Default = G1 which is Geo-Redundant with 3 local replicas and 3 geo-distributed replicas.

Optional Configuration:  Diagnostics

Here is where you set if diagnostics will be sent to the storage account.

Subscription

The Subscription blade is where to specify which Azure subscription to use for these. I only have one to choose from.


Location

This last option relates to where the farm will be created.


The last option near the bottom is to Add to Startboard. Keeping this box checked (which is the default) will create a live tile on the main dashboard when you log in to the new Azure portal.

And with that, all the options should be configured. You might want verify each is correct, then click the Create button. Now the Startboard will display "Creating SharePoint Farm" until setup is complete.

After about 10 minutes, the deployment is complete. Where to go from this point will be discussed in Part 2.

Update 7/17:  The Azure team looked at the correlation ID for my deployment and determined why the error was being shown on the Startboard (in the screen shot just above). They'll be getting it fixed in their next release. From my end, I can connect to the servers and connect to Central Administration so it looks like I can safely proceed with the next steps to get things set up.

Part 2 is continued here:  Creating a SharePoint Server Farm in Azure - Part 2.

Finding More Information

TechNet Blog:  Step-by-Step: Deploy a Highly Available SharePoint Server Farm in the Cloud in Only 8 Clicks

Azure Documentation:  SharePoint Server Farm

How Often are Thumbnail Images Refreshed in the Power Pivot Gallery?

Overview:  A brief discussion of how and when the thumbnail preview images in a Power Pivot Gallery in SharePoint get refreshed.

The Power Pivot Gallery is a specialized document library in SharePoint which utilizes Silverlight to render preview images of the report.  These previews are very helpful for users to quickly see if they have the correct report selected before executing it.

image

Ways to Refresh Thumbnail Images

Originally I had thought there would be a timer job which refreshes the thumbnails at a regular interval.  However, that is not the case.  There are 3 ways I’ve found to get thumbnails refreshed:

1.  Upload a new workbook.  The act of uploading a new workbook causes an event handler which will populate the thumbnail image for that workbook.

2.  Modify a workbook. The act of saving an existing workbook causes an event handler which will update the thumbnail image for that workbook.  Even if all you do is Edit Properties and then Save, that’s enough.

3.  Manually execute GallerySnapshot.exe.  This is a Windows service that runs on the app server where Excel Services is installed.  This exe gets called automatically when a file in the Power Pivot Gallery has been added or changed (an itemAdded or itemUpdated event, respectively, as mentioned in #1 and #2 above).  To run it manually, refer to this information:  http://blogs.msdn.com/b/mtn/archive/2010/10/15/how-to-manually-refresh-powerpivot-gallery-thumbnails.aspx.  Note that this service was called GetSnapshot.exe in SharePoint 2010, and has been renamed to GallerySnapshot.exe in SharePoint 2013.  The SharePoint 2013 GallerySnapshot.exe can be found at:  C:\Program Files\Common Files\Microsoft Shared\Web Server Extensions\15\BIN.

The takeaway:  Since the thumbnails only get regenerated in the above circumstances (and not at a regular interval), the preview images shouldn’t be thought of as something that is intended to coincide exactly with data updates.

Finding More Information

Technet – Refresh a Thumbnail Images

MSDN – Refreshing Power Pivot Gallery Thumbnails

Power Pivot Geek – General Problems with Gallery Snapshots Not Being Taken


Displaying a Power View Report on a SharePoint Page

Overview: How to structure the URL for displaying a Power View report on a SharePoint 2013 page, including what parameters to pass in the URL.  This entry presumes the reader is familiar with SharePoint basics, including how to create a site page.

Ways to Render Power View Reports Within SharePoint

Because of its support for previewing the report via thumbnail images, the PowerPivot Gallery is a very common way of storing & accessing Power View reports:

     image

However, perhaps you really would like to display a Power View report on a SharePoint page, possibly as part of a dashboard that combines various types of reports. 

Ways of rendering Power View reports in SharePoint 2013 include:

  • Via the PowerPivot Gallery (as shown above)
  • Via a regular document library (note: it won’t have the thumbnail previews like the PowerPivot Gallery does due to its integration with Silverlight)
  • Within a Page Viewer Web Part
  • Within a Silverlight Web Part (note: since word on the street is that Silverlight has a finite lifespan, this might not be your first choice)
  • Embedded within a PerformancePoint Dashboard (via the web page report type)
  • Within an Excel Web Access Web Part (applicable to Power View reports created with Excel 2013)

Note that even though Power View is part of the Reporting Services family, you cannot use the SQL Server Reporting Services Report Viewer web part – it can only display RDL files (generated from Reporting Services or Report Builder).  It cannot currently display RDLX files (generated from Power View for SharePoint).

The remainder if this blog entry focuses on the Page Viewer Web Part.

Steps to Use the Page Viewer Web Part

First, you’ll want to create a Site Page in SharePoint if you don’t have one already.  Once you are in Edit mode for your page, go to the Insert ribbon.  From there, choose Web Part on the ribbon.  Browse through the Media and Content category to find the Page Viewer.  Make sure you’ve clicked within the section you want the Power View report to be in, then click Add.

     image

Then you’ll want to click the “open the tool pane” hyperlink to access its properties.

     image

There are four sections of properties – only the first two sections are really important for displaying our Power View report.

Page Viewer Properties

  • Web Page radio button – Leave this selected.
  • Link – Specify the URL which will look something like this (below is more detail about constructing the URL):

    /_layouts/15/ReportServer/AdHocReportDesigner.aspx?RelativeReportUrl=%2fPowerPivot%20Gallery%2fMC%20Garden%20Center%20Analysis.rdlx&ViewMode=Presentation&ReportSection=ReportSection2&Fit=True&PreviewBar=False

     image

Hint:  the only piece that is absolutely positively required is the URL as shown in the above Page Viewer section…but if you skip the rest of the settings, you’ll end up with awfully ugly output that isn’t readable at all:

     image

Since we want it to be pretty, we’ll carry on with the rest of the properties…

Appearance Properties

  • Title – Change this from Page Viewer if you intend for the title to be shown (often the report itself will have a title, so often you can omit titling the web part itself too).
  • Height – Here’s where you are going to need to experiment somewhat.  The “Adjust height to fit zone” default doesn’t really do the trick from what I have seen.
  • Width – Chances are you can leave this as-is so it adjusts to fit the zone.
  • Chrome State – You’ll want to leave this as normal to ensure the report itself displays.
  • Chrome Type – Set this based on how you want to see the page.  If you are skipping the Title (i.e., if the report itself has a title), you might set the Chrome Type to have a border only, or perhaps none. 

     image

Layout Properties

Nothing required to be changed here.

     image

Advanced Properties

Nothing required to be changed here unless you’d like.

     image

Constructing the URL for Display of the Power View Report

Now let’s take a step back and look at how the URL is constructed.  It uses the AdHocReportDesigner.aspx page, as well as several parameters, including:

  • RelativeReportURL – Points to the RDLX file
  • ViewMode – Presentation or Edit
  • ReportSection – Reference to which view will be displayed initially
  • Fit – True/False setting which allows for resizing
  • PreviewBar – True/False setting which controls if the menu across the top is shown or not

Here’s how the URL can be broken down into its components:

     image

How the Power View Report Looks In the Page Viewer Web Part

How it ends up looking in SharePoint depends a lot on the parameter values you pass in via the URL, as well as the Height property you set in the properties.  Note that the pagination controls at the bottom left & bottom right are still active which is nice.  This means that even if you set the URL to jump to view 6, for instance, the end user can still paginate through and see all the views (i.e., pages) contained within the single Power View report.

Here’s an example where the Report Section is set to launch page 2 immediately, the View Mode is set to Presentation, and the Preview Bar is set to False within the URL string:

     image

Here’s another example of the same report, except the Preview Bar is set to True within the URL string:

     image

And here’s one more example of the same report, this time with the View Mode set to Edit:

     image

Prerequisites

SharePoint needs to be on-premises (as opposed to SharePoint Online) and configured in “SharePoint View Mode” rather than “Office Web Apps Server Mode.”  I’m guessing this is a temporary limitation around OWA support.

The Power View report needs to be created in SharePoint, as opposed to within an Excel 2013 file.  This requires the Reporting Services Add-In for SharePoint.

The browser must support the <iframe> element, which basically nests browsing context separately from the entire page.  All major modern browsers support iframes.

Finding More Information

Dan English Blog – Presenting Power View Reports to Users

Dan English Blog – URL Actions within Reporting Services Power View (RTM)

Himanshu Gupta Blog – Integrate Power View with SharePoint Using Web Parts

Office - Power View in Excel  in SharePoint Server or SharePoint Online in Office 365