
Dataflows in Power BI are a really interesting capability for centralizing and reusing Power Query logic among many different PBIX files. If you’ve found yourself copying M scripts (Power Query formula language) between files, or creating a library of M scripts then you should look into dataflows.
I won’t rehash the basic overview info here because it has been well covered by other bloggers. In particular, Matthew Roche has been writing a lot of good stuff:
This post is to focus on what I’m referring to as ‘the three ways to use Power BI dataflows.’ I talked about this on the March BlueGranite Office Hours session on Power BI Dataflows (video recording | slides).

Dataflows Option 1: Fully Managed by Power BI
In this first option, Power BI handles everything. We use the web-based Power Query Online tool for structuring the data. Power BI handles scheduling the data refresh.
The underlying data behind the dataflow is stored in a data lake. However, since it’s fully managed, this data lake is not directly accessible or visible to the customer. As with most cloud-based implementations, the infrastructure is hidden under the covers. This is what is happening if your users are utilizing dataflows currently but you haven’t specified a data lake account in the Power BI admin center.
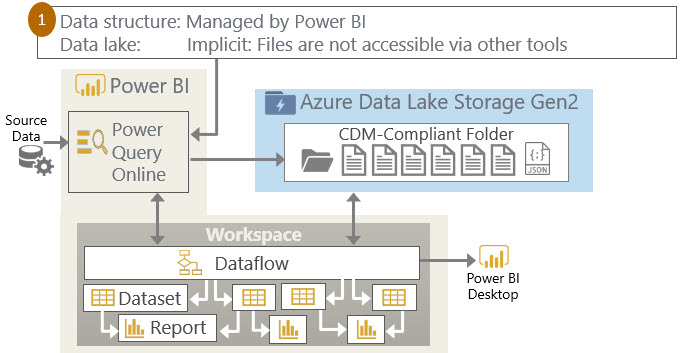
Option 1 above is useful when all of your data preparation is done by analysts and Power BI is the only tool which accesses that data.
Dataflows Option 2: Managed by Power BI with an Explicit Data Lake
In this second option, the diagram looks exactly the same as option 1. The key difference is that we have associated our data lake account to Power BI. This is the “bring your own data lake” scenario which means we can actually view the data behind the scenes with a tool such as Azure Storage Explorer (dataflows data is comprised of csv files and the model.json file which contains the schema and other metadata).
With this option we are still using Power Query Online and Power BI for the data refresh, so it’s still very business user-friendly in terms of maintaining the data.

Option 2 above is useful when your data analysts like using Power Query Online for data prep, but you still want the ability to access the data independently of Power BI.
Dataflows Option 3: External Dataflows (Managed Outside of Power BI with an Explicit Data Lake)
With the third option, we are maintaining the data with another tool such as Azure Databricks or Azure Data Factory. You could even use something as simple as a text editor if you’d like - Chris Webb talks about that in this blog post. Power BI’s role here is reduced to being a consumer of the data.
Although Power BI doesn’t take responsibility for updating external dataflows, the dataflow can be consumed by PBIX files like any other dataflow. This is great because the user experience for using the dataflow output doesn’t change.

Option 3 above is useful when your data lake is part of your strategic data architecture and is integrated with other Azure technologies**. It is more complicated though because you’re also responsible for managing the metadata in the model.json file which accompanies the actual data files. When you have a balance of corporate BI and managed self-service BI needs, a combination of options 2 and 3 are useful.
**Use of dataflows does currently require a filesystem in ADLS Gen2 called “powerbi” so at this point in time (March 2019) we cannot refer the dataflow to just any folder in the data lake. I hope this changes because segregating this data doesn’t lend itself well to a corporate data lake strategy. Also, naming convention junkie that I am…using the name of “powerbi” for the filesystem also doesn’t make 100% sense when there’s other tools involved. I’d rather rely on my normal process of organizing the data lake by subject area and security boundaries.
Summary of the 3 Options
It’s important to be aware that all 3 options can be used simultaneously in the same Power BI tenant.
This table summarizes the above options and (very) loosely correlates them to the types of BI implementations they support:

Consider this expanded scenario:
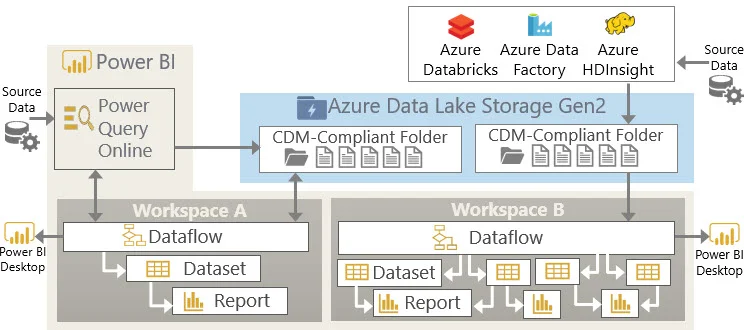
Workspace A is managed by Power BI.
If Workspace A is *not* associated to the dataflows storage, the dataflow functionality works normally but data in the lake is not accessible other than through Power Query Online. This is Option 1.
If Workspace A *is* associated to the dataflows storage, it’ll be visible in ADLS Gen2. This is Option 2.
Workspace B is associated to dataflows storage, and is managed outside of Power BI. This is option 3.
Important Settings in the Power BI Admin Center
To allow dataflows to be utilized by your users (i.e., to use any of the 3 options above), they need to be enabled in the tenant settings:

To be able to “bring your own data lake” (i.e., to use options 2 or 3), you need to do two things. The first task is to associate your Azure Data Lake Storage Gen2 account to the Power BI tenant:

Note that there are currently (as of March 2019) some pretty big limitations with the above setting:
You can only associate on ADLS Gen2 account for your entire Power BI tenant.
It requires an ADLS Gen2 filesystem called “powerbi” which means we cannot point to just any folder in the data lake.
Once the ADLS Gen2 account is associated to Power BI, it cannot be changed. So be very careful with POCs and such until this becomes more flexible.
The second required task to make options 2 or 3 work is a workspace-specific storage setting for every workspace where dataflows might exist:

If the workspace storage setting for dataflows is set to No, then the dataflows in that workspace are using option 1 (which means they still work just fine, you just won’t see the data in your data lake even if you’ve set the data lake account in your tenant settings). If the workspace storage setting is set to Yes, then you are free to use options 2 or 3.
To facilitate the above workspace storage setting, there is one more property to be aware of. In the same pane as where we specify the ADLS Gen2 account, there is a Yes/No toggle to allow workspace admins to assign workspaces to the storage account:

At this time the workspace default for dataflows storage is set to No, so it’s easy to forget — I’m hoping that default changes to Yes if there’s a data lake specified in the tenant settings.
Requirements for ‘Bring Your Own Data Lake’
Here’s a final summary of the requirements to be able to implement option 2 or 3:

Finding More Information
Connecting ADLS Gen2 to Dataflow Storage in the Power BI Service
Power BI Dataflows and Azure Data Lake Integration
You Might Also Like…
March 2019 BlueGranite Office Hours session on Power BI Dataflows: video recording | slides)
Resources for Learning About Azure Data Lake Storage Gen2
Planning for Accounts, Containers, and File Systems for Your Azure Data Lake Storage