Updating Metadata in SSIS

This is just a quick tip re: updating metadata in SSIS. A few days ago I was speaking with an SSIS developer who wasn't aware of this change so I thought I'd share it.

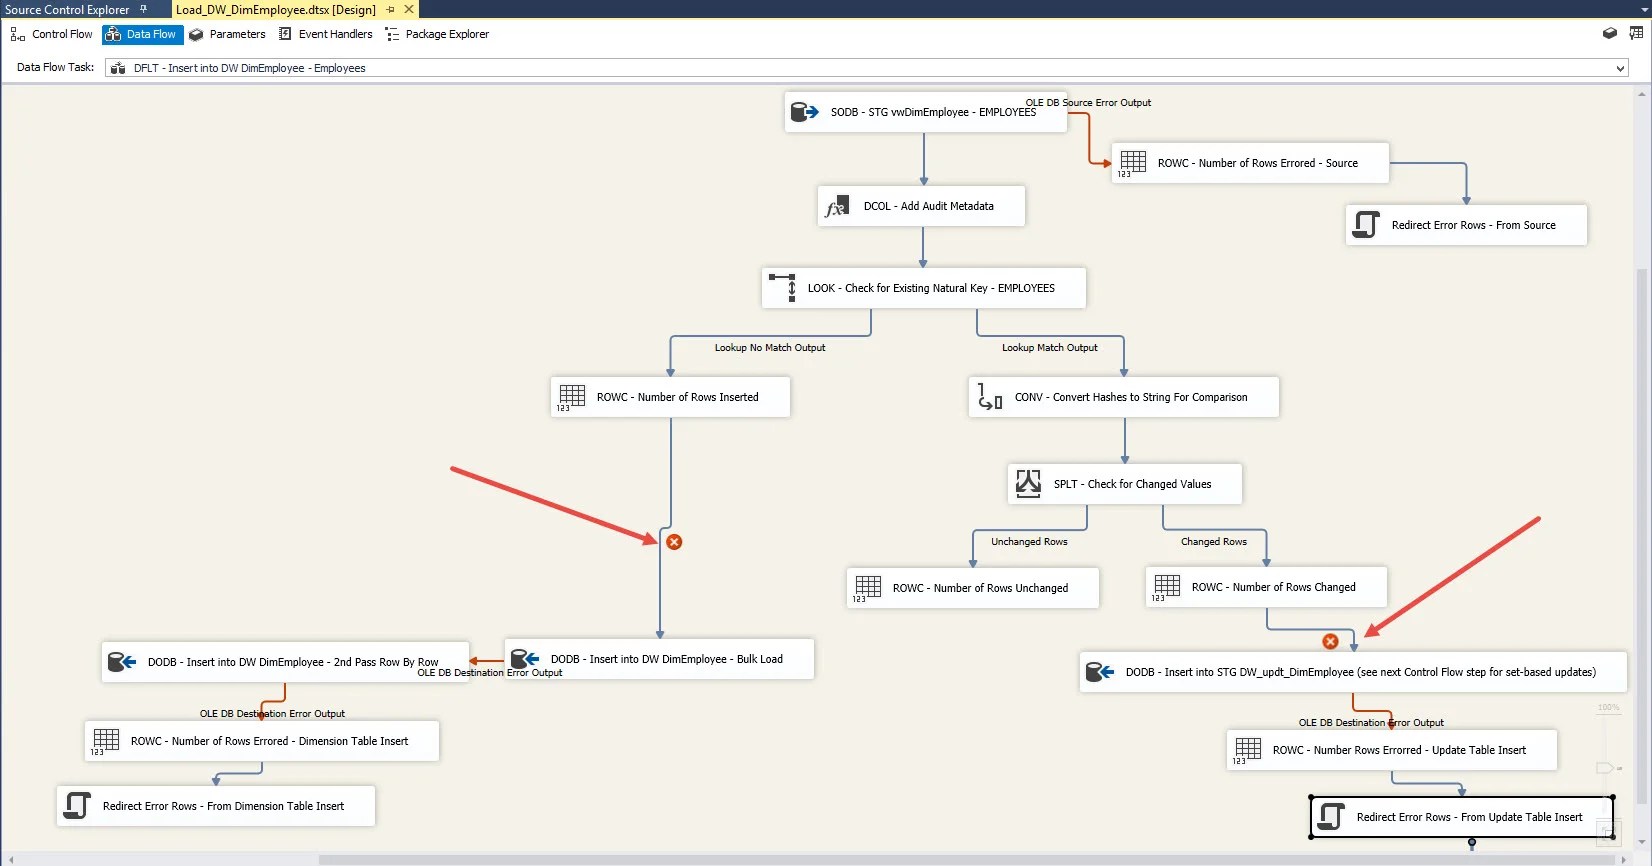
Let's say a column is deleted in the underlying table or view that feeds an SSIS package. Or, maybe you're starting with a 'template' SSIS package that has metadata for a different table than the one you are building...once you adjust the source query, you see red X's on the precedence constraints (pipeline paths) in the data flow:

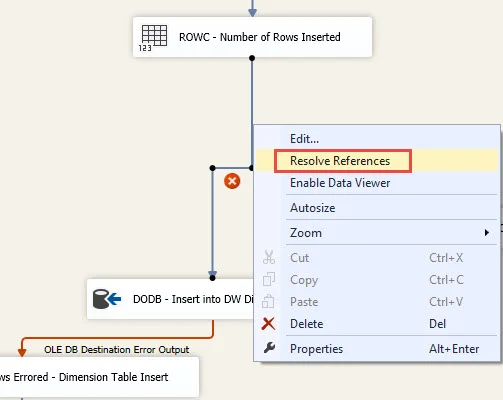
Prior to SQL Server 2012, updating metadata changes of this nature was a very tedious process. It's now *much* easier than it was before. First, you right-click on the precedence constraint and choose Resolve References:


Then you want to check the box on the bottom left (it's not checked by default) then OK. It will then delete the downstream references in the package for the column(s) which no longer exist:


And voila, the references no longer exist for the transformations down below in the data flow. You might have to do this in a couple of places if the data flow splits off (like mine does in the screen shot). Depending on what else changed, you may also need to 'click through' some of the pages of some transformations to update metadata (ex: a data type change), but the Resolve References functionality is a huge time-saver.

My BlueGranite colleague and friend Meagan Longoria has been convincing me recently that these are the kind of changes that BIML is well-equipped to take care of quickly & efficiently when it regenerates a package. I will learn BIML soon (really I will, I will), but in the meantime, Resolve References sure is a handy thing to know. It certainly delighted the SSIS developer I was speaking with last week!

You Might Also Like...

Getting Started with Parameters, Variables & Configurations

Parameterizing Connections and Values at Runtime Using SSIS Environment Variables

Documenting Precedence Constraints in SSIS

Why You Should Use a SSDT Database Project For Your Data Warehouse

In this post, I will try to convince you that using SQL Server Data Tools (SSDT) Database Projects is a really good idea. Recently during a project I've been advocating that it indeed is worth the effort. Since I'm a BI architect, I'm framing this conversation around a data warehouse, but it certainly applies to any type of database. 

What is a Database Project in SQL Server Data Tools (SSDT)?

A data warehouse contains numerous database objects such as tables, views, stored procedures, functions, and so forth. We are very accustomed to using SSDT BI projects (formerly BIDS) for SSIS (Integration Services), SSAS (Analysis Services), and SSRS (Reporting Services). However, it's a less common is using SSDT to store the DDL (data definition language) for database objects.

Below is an example of how you could structure your database project (am only showing a few tables and views in the screen shots for brevity). You don't have to structure it this way, but in this project it's sorted first by schema, then by object type (table, view, etc), then by object (table name and its DDL, etc).


The contents of items in the SSDT DB project are the 'Create Table' statements, 'Create View' statements, 'Create Schema' statements, and so forth. This is based upon “declarative database development” which focuses on the final state desired for an object. For instance, here's the start for a DimDate view:

Since the DimDate view resides in the DW schema, the database project would do me the favor of generating an error if the DW schema didn't already exist, like follows:


Team Foundation Server does integrate well with database projects (i.e., for storing scripts for database objects such as tables, views, and functions), Integration Services, Analysis Services, and Reporting Services.

There's an online mode as well as offline mode; personally I always use the project-oriented offline mode.

Now that we know about the structure of what's in a project, let's talk next about how we manage changes, such as an alter to add a new column.

Managing Changes To Database Objects

The next big thing to know is that there's a mechanism for managing DDL changes, for instance a new column or a change to a data type. Instead of putting an 'Alter Table' statement into the database project, instead you edit that original 'Create Table' statement which focuses on the final state that includes the new column.

Now let's say you are ready to promote that new column to Dev, QA, or Production. Here's where it gets fun. In the database project you can do a 'Schema Comparison' operation which will compare the DB objects between the project and the database. It will detect the difference and script out the necessary 'Alter Table' script to use in your deployment to Production.

The output above tells us there's a data type difference between the project and the database for an address column. This helps us reconcile the differences, then we can generate a script which would have an Alter Table statement for the address column (though in the above case, the address is varchar(150) in the database which probably means the ETL developer widened the column but forgot to circle back to the database project - so there's still a lot of judgment when comparing the project to Dev).

Let's take this one step further. When we're ready to promote to a new environment, we can do a schema comparison between Dev and QA, or QA and Prod, and generate a script that'll contain all of the Creates and Alters that we need to sync up the environments. If you are envisioning how handy this is for deployment purposes, then I've already accomplished my mission. (Keep reading anyway though!)

There's a lot more to know about using schema compare, but let's move next to the benefits of using an SSDT database project.

Benefits of Using a Database Project in SQL Server Data Tools (SSDT)

DB projects serve the following benefits:

  • Easy availability to DDL for all objects (tables, views, stored procedures, functions, etc) without having to script them out from the server and/or restore a backup. (See additional benefits in the next list if you also integrate with source control, which is highly recommended.)
  • Functionality to script out schema comparison differences for the purpose of deployment between servers. If you've ever migrated an SSIS package change and then it errored because you forgot to deploy the corresponding table change, then you'll appreciate the schema comparison functionality (if you use it before all deployments that is).
  • Excellent place for documentation of a database which is easier to see than in extended properties. For example, recently I added a comment at the top of my table DDL that explains why there's not a unique constraint in place for the table.
  • Provides a location for relevant DML (data manipulation language) statements as well, such as the unknown member rows for a dimension table. Note: DML statements do need to be excluded from the build though because the database project really only understands DDL.
  • Snapshot of DDL at a point in time. If you'd like, you can generate snapshot of the DDL as of a point in time, such as a major release. 

Additional benefits *if* you're using a DB project also in conjunction with source control such as TFS:

  • Versioning of changes made over time, with the capability to quickly revert to a previous version if an error has occurred or to retrieve a deleted object. Useful comments should be mandatory for all developers who are checking in changes, which provides an excellent history of who, when, and why a change was made. Changes can also be optionally integrated into project management processes (ex: associating a work item from the project plan to the checked-in changeset).
  • Communicates to team (via check-outs) who is working on what actively which improves team effectiveness and potential impact on related database items.

Tips and Suggestions for Using a SSDT Database Project

Use Inline Syntax. To be really effective for table DDL, I think it really requires working -from- the DB project -to- the database which is a habit change if you're used to working directly in SSMS (Management Studio). To be fair, I still work in SSMS all the time, but I have SSMS and SSDT both open at the same time and I don't let SSDT get stale. The reason I think this is so important is related to inline syntax - if you end up wanting to generate DDL from SSMS in order to "catch up" your database project, it won't always be as clean as you want. Take the following for instance:

In the above script I've got some default constraints (which are named because who wants the ugly DB-generated constraint names for our defaults and our foreign keys and such, right?!?). The constraints are all inline -- nice and tidy to read. If you were to script out the table shown above from SSMS, it would generate Alter Table statements for each of the constraints. Except for very small tables, that becomes impossible to validate that the DDL is just how you want it to be. Therefore, I suggest using inline syntax so that your database project SQL statements are all clean and easy to read.

Store Relevant DML in the Project (Build = None).  If you have some DML (data manipulation language) statements that are manually maintained and need to get promoted to another environment, that makes them an excellent candidate for being stored in the DB project. Since the database project only understands DDL when it builds the project, the 'Build' property for each DML SQL script will need to be set to None in order to avoid errors. A few examples:

Build the Project Frequently. You'll be unpopular with your coworkers if you check something in that doesn't build. So you'll want to develop the habit of doing a build frequently (around once a day if you're actively changing DB objects), and always right after you check anything in. You can find the build options if you right-click the project in Solution Explorer. Sometimes you'll want to choose Rebuild because then it’ll validate every object in the solution whether it changed or not (whereas the Build option only builds objects it detects changed, so although Rebuild takes longer it’s more thorough).


One more tip regarding the build - if a schema comparison operation thinks a table exists in the database but not in the project, check the build property. If it's set to None for an actual DDL object, then it will accidentally be ignored in the schema comparison operation. Bottom line: set all DDL objects to build, and any relevant DML to not build.

Do a Schema Comparison Frequently. Regularly running a schema compare is a good habit to be in so that there isn't a big cleanup effort right before it's time to deploy to another environment. Let's say I'm responsible for creating a new dimension. As soon as the SSIS package is done with the DDL for the table and views(s) as appropriate, I'll do a schema compare to make sure I caught everything. If your team is a well-oiled machine, then if you do see something in the schema comparison between the project and the Dev DB, it should be something that you or a coworker is actively working on.

Save the Schema Comparison (SCMP) Settings in Your Project.  To make it quick and easy to use (and more likely your whole team will embrace using it), I like to save the schema comparison settings right in the project. You can have various SCMPs saved: Project to Dev DB, Dev DB to QA DB, QA DB to Prod DB, and so forth. It's a big time-saver because you'll want to tell the schema compare to ignore things like users, permissions, and roles because they almost always differ between environments. By saving the SCMP you can avoid the tedious un-checking of those items every single time you generate the comparison.

SSDT_schemacompare2.jpg

Do a 'Generate Script' for the Schema Comparison; Don't Routinely Use the Update Button. Just to the right of the Update button (which I wish were less prominent) is the Generate Script button. This will create the relevant Create and Alter statements that it detects are necessary based on the differences found. Scripting it out allows you to validate the script before it's executed, and to save the history of exactly what changes are being deployed when (assuming it's being done manually & you're not doing automated continuous deployments to Prod). I also prefer to generate the script over letting SSDT do a straight publish because items that are checked out are still part of a publish and we don't usually want that (though it does depend on how you handle your source control branching). 


While we're on the subject of the scripts generated by the DB project: a couple of things to know. First, you'll need to run the script in SQLCMD mode (in SSMS, it's found on the Query menu). Second, the scripts are not always perfect. For simple changes, they work really well, but sometimes things get complicated and you need to 'manhandle' them. For instance, there might be data in a table and the script has a check statement in the beginning that prevents any changes and might need to be removed or handled differently.

Separate Installation for SSDT vs SSDT-BI Prior to SQL Server 2016. If you go to create a new project in SSDT and you don't see SQL Server Database Project as an option, that means you don't have the right 'flavor' of SSDT installed yet. Thankfully the tools are being unified in SQL Server 2016, but prior to that you'll need to do a separate installation. The SSDT installation files for Visual Studio 2013 can be found here: https://msdn.microsoft.com/en-us/library/mt204009.aspx.

There's a lot more to know about DB projects in SSDT, but I'll wrap up with this intro. There is a learning curve and some habit changes, but hopefully I've encouraged you to give database projects a try.

Finding More Information

Jamie Thomson's blog - 10 Days of SSDT

Jamie Thomson's blog - Considerations When Starting a New SSDT Project

MSDN - Project-Oriented Offline Database Development

Why Is My Relationship Inactive in Power BI Desktop?

Summary

The Power BI Desktop tool now attempts to utilize bi-directional relationships when it can. If any ambiguity exists, some of your relationships may become inactive. If you are seeing inactive relationships (the dotted line), take a look in Advanced properties to see if the “cross filter direction” is set to “Both” rather than “Single” for some of the relationships. This is particularly true if you have multiple fact tables in your dataset – it’s recommended to stay away from bi-directional relationships if dimension (lookup) tables are shared across fact tables. Although the “cross filter direction” property allows many-to-many relationships and offers more flexibility with respect to filter propagation, my approach is to use bi-directional filtering sparingly and only when a specific analytical need has been identified.

How Power BI Desktop Handles Relationships

After doing some experimentation, reading, and talking with people, I've learned these important things:

  • Power BI Desktop will auto-detect relationships when it can (ex: matching column names and data types). According to this Power BI Support article“Cardinality, Cross filter direction, and Active properties are automatically set.”
  • Power BI Desktop won’t necessarily create all relationships. If it doesn’t have a very high confidence what to do, it won’t create the relationship.
  • Power BI Desktop will attempt to set the cross filter direction to “Both” whenever it can – that’s the new default behavior.
  • Power BI Desktop may set a relationship to inactive if there is some ambiguity present.

So, be sure review all of the relationships in your dataset, and don’t rely entirely on the auto-detect functionality. 

How to Create Relationships in Power BI Desktop

There are three ways to create relationships in Power BI Desktop:

My preferred method for creating a relationship is to use the “Manage Relationships” pane. This allows me to specify the column from each table, as well as the items under Advanced options including cardinality, cross filter direction, and if it’s active or not. 

Second method is to drag one column to another in the Relationships pane. This way sets all of the advanced options to its default settings. Since I have very specific preferences for the Advanced options, I tend not to use this alternative as often.


Third method is to use the Autodetect functionality within the Manage Relationships window. This can be a time-saver, but you still need to verify each one is doing what it’s supposed to do. Therefore, I tend to lean towards creating them manually so that I’m certain the data model is specified exactly the way I want it. Since Power BI Desktop does Autodetect by default, you probably won't need to use Autodetect unless you've deleted some relationships along the way.


What are Bi-Directional Relationships in Power BI?

Bi-directional relationships have a few aliases. People refer to it as as BiDi, cross filtering, and/or many-to-many.

When set to “Single,” the dimension (or lookup, from the ‘one’ side of the relationship) can filter the fact (or base table from the ‘many’ side of the relationship), but it cannot filter the other way around. That's why the arrow points one direction. In the following screen shot, this means we can slice and dice the Quantity measure (from the fact) by Customer (from the dimension). For example: Sum of Quantity by Customer.

This works well for most scenarios when a traditional dimensional model (aka star schema) is implemented, wherein dimensions contain attributes and facts contain measures. This facilitates the slicing/dicing in the dimension and aggregation in the fact. 


Conversely, bi-directional relationships permit filters to propagate in Both directions (as opposed to one-way with the Single filter). Under the covers, for filtering purposes, Power BI Desktop treats the two tables as if they’ve been flattened into one single table.

With the standard “Single” direction relationship as shown above, we could *not* do something like Count of Customers by Quantity sold – that type of question is moving the aggregation to the dimension and the slicing/dicing to the fact which is the inverse of what we usually do. However, the Both setting allows that type of analysis to work.


Sounds like a great idea. Why wouldn’t we want to always do this?

When to Avoid Using Bi-Directional Filtering in Power BI Desktop

If you have more than one fact table in your dimensional model, you want to stay away from the ‘Both’ setting. I don’t claim to understand entirely how it works under the covers, but I can confirm that you end up with some inactive relationships that you really want to be active. As you probably know, an inactive relationship can only be invoked through a DAX calculation so that limits some self-service BI scenarios.

We have a project with a traditional star schema with 4 fact tables and approximately 15 dimensions (about half are actually role-playing date dimensions). Each relationship from dimension to fact represents a standard 1-to-many. After migrating the existing model from XLSX into Power BI Desktop, I was surprised to see approximately 5 of the relationships were set to inactive in Power BI Desktop. Here is a vastly simplified version of that data model (reduced to 2 dimensions in this example) to illustrate what I was experiencing:

See in the above screen shot how some of the relationships are inactive? That’s because Power BI Desktop detected some ambiguity. Since some of the ‘Both’ cross filter settings were allowing bi-directional relationships, that caused issues when trying to create relationships which otherwise are absolutely valid and active. This Power BI Support article states: “If you have two or more tables that also have lookup tables (with some in common) then you wouldn't want to use the Both setting.” So, my general rule is to avoid using the ‘Both’ setting when any dimension (lookup) tables are shared among multiple fact (base) tables.


Also, be aware that since the bi-directional ‘Both’ setting does alter how filters work, more complex queries may be sent to the data source. So be sure to test for both performance and accuracy, and that row level security does what you expect it to do. The kind of testing we always do anyway, right? Right.

In conclusion, I would like to propose that bi-directional cross filtering should be used in moderation – If you have a specific analytical need, and if there is one single fact table sitting in the center of dimension (lookup) tables then it should be just fine to use. If you see some unexpected behavior, or you see inactive relationships that you don't expect, the relationship settings are one area to check.

Finding More Information

Power BI Support:  Create and Manage Relationships in Power BI Desktop

Chris Webb Blog: Bi-Directional Relationships and Many-to-Many in the Power BI Designer

      and One-to-One Relationships in Power BI

You Might Also Like...

Groups in Power BI - How Sharing and Security Works

Direct Connect Options in Power BI for Live Querying of a Data Source

How to Stop an Azure Virtual Machine on a Schedule

As you've probably heard, Azure Virtual Machines can be stopped when not in use in order to save subscription costs. My personal Azure VMs are stopped more than they're started because they're my personal sandbox/learning areas. I've set up Azure Automation to stop my VMs each evening so I don't have to rely on memory.

The technique I'm describing below is a little different than what Dustin Ryan blogged about - I've chosen to use a credential instead of a certificate since I've got Azure Active Directory running in my environment (though I do get plenty of notifications about unhealthy synchronization attempts since my VMs are off!). It does require an account to be a co-administrator in Azure; if you're uncomfortable with that, take a look at the certificate approach Dustin talks about.

1. AD User.  First, set up a domain user in Active Directory. I chose to call mine AAutomation. Since its purpose is for Azure Automation, it doesn't need to be a member of any particular groups in AD; mine is just in the Users group.  The user ID and password will be stored in an Azure Automation Credential (step 5 below), so handle your password expiration setup (or use of an MSA) as you see fit. 

After it the sync runs between AD and AAD, you're ready for the next step.

2. PowerShell Script. Next we need a PowerShell script to perform the shutdown action. Create your script and store it in a .ps1 file for when we need it in a later step. Here's what my script looks like for shutting down four VMs. Note you can also use a "*" to shut down all VMs which would prevent future maintenance of the script. That would work for me, however, I am a co-administrator of another "real" environment in which we have certain VMs that stay up 24/7; therefore this example specifies which VMs should be shut down (one of those cases where I used my own sandbox to test prior to putting into the real environment). Also notice that this PowerShell script references the Azure Automation account we created in step 1.

workflow StopAzureVM {
    inlineScript {
        $Cred = Get-AutomationPSCredential -Name "AAutomation@YourDomainNameHere.com"
        
        Add-AzureAccount -Credential $Cred
        
        Select-AzureSubscription -SubscriptionName "SubscriptionNameHere"
        
        Stop-AzureVM -ServiceName "ResourceGroup1NameHere" -Name "VMName1Here" -Force
        Stop-AzureVM -ServiceName "ResourceGroup2NameHere" -Name "VMName2Here" -Force
        Stop-AzureVM -ServiceName "ResourceGroup3NameHere" -Name "VMName3Here" -Force
        Stop-AzureVM -ServiceName "ResourceGroup4NameHere" -Name "VMName4Here" -Force
    }
}

3. Azure Co-Administrator. Go to Settings in the Azure management portal. Add your new AAutomation account to be a co-administrator.

4. Azure Automation Account. Go to Automation in the Azure management portal. Create a new Automation Account. I called mine AAutomationAccount to coincide with the naming convention for the User AD account. It'll take just a few moments for it to be created.

AAutomation3.png

5. Automation Credential. Click the name of your new Automation Account to go into its properties. Go to the Assets page where you'll see some predefined items. Click Add Setting. Here's where you want to Add Credential. The type will be Windows PowerShell Credential (rather than a certificate). In this dialog box you will specify the user and password that were set up in step 1.


6. Import PowerShell Script. Go to the Runbooks page and choose Import. Here we want to import the PowerShell script created in step 1. 

AAutomation5.png

7. Publish Runbook. After the page refreshes, click the name of your Runbook to go into its properties. Go to the Author page. If Azure converted any of your syntax (i.e., to a workflow), you'll see some comments about that. Notice at this point that the script is in draft status. At this point you can test the script. When everything looks ok, Publish the script so that it can be scheduled.

8. Set up Schedule. Go to the Schedule page and choose Link to a New Schedule (unless you have an existing schedule that is). Specify the timing that works for you. Once it's set up, you should see it on the Schedule page. You can also visit the Dashboard page for other information about the Automation job status.

That's it for the steps to schedule Azure VM(s) to shut down on a schedule.