How to Parameterize a Source Query in SSIS Using Attunity Connector for Oracle

The steps we are going to follow include the following:


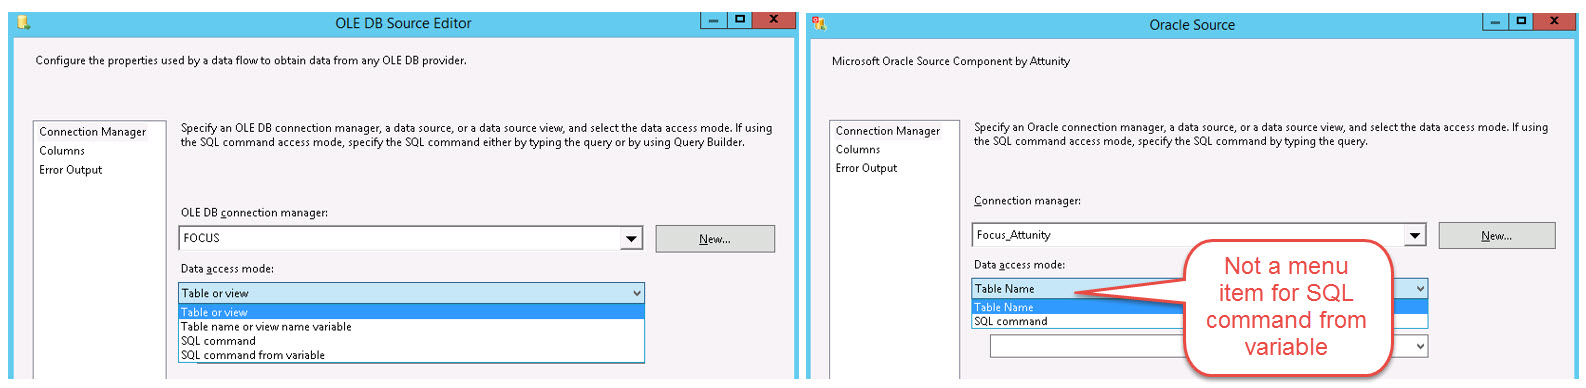
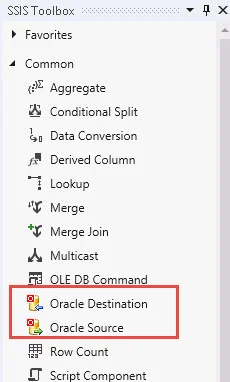
The Attunity connector for Oracle used inside of the SSIS data flow looks a little different than the typical OLE DB connector we most commonly use. Specifically, the Attunity source has two options: “Table Name” and “SQL command.” What the Attunity Oracle Source doesn’t have in this dialog box is “SQL command from variable” (like we see for an OLE DB source).

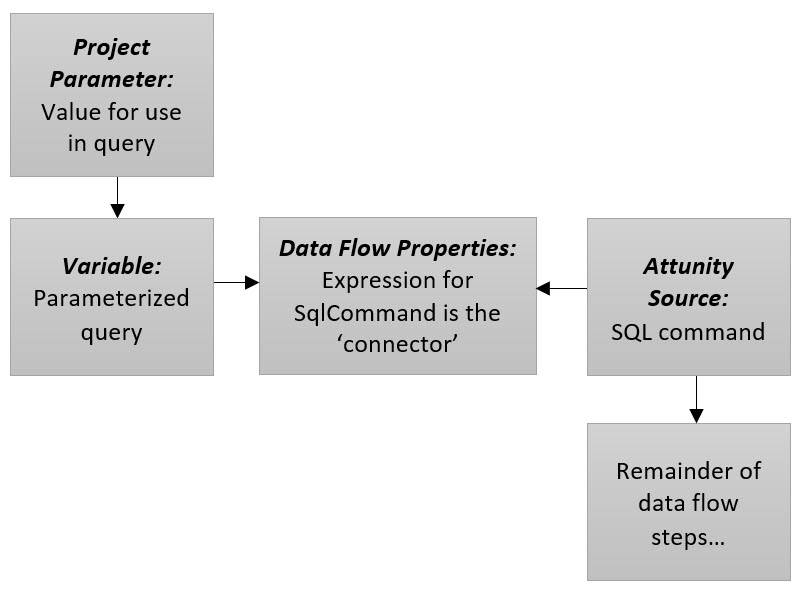
In SSIS, in order to utilize a parameterized query in the data flow source, we typically use a variable that contains the SQL statement and the parameter reference(s). Just because the Attunity Oracle Source dialog box doesn’t show “SQL command from variable” doesn’t mean we can’t get the job done though. It’s just a slightly different process.

Prerequisites: The Attunity connector is already set up in your SSDT environment.

This process references using SQL Server 2012+ and the SSIS project deployment mode.


Step 1. Create a Project Parameter

Since the source query will be parameterized, first we need a place to store this parameter value. The best choice if the value is to be shared across packages is a project-level parameter. You could also use a package-level parameter if it’s not going to be shared across more than one package, and still get the benefit of being able to change the value at runtime if necessary (editing the value at runtime is why we like using a parameter better than a variable for the value of the parameter).

In this example the project parameter is called IncrementalDays_TaskDate which, in our case, means we are going to bring in a 3-day window of time.


Step 2. Create a Variable for the Parameterized Source Query

Here’s a simple query example where I’ve pulled in the project parameter created in step 1. This is inside of the expression builder of a variable. Note that in the expression builder, the text is surrounded by double quotes ( " ) and plus signs ( + ) concatenate the text with the parameterized portion. By clicking the "Evaluate Expression" button, we see the 3 day value as per the value in our project parameter.

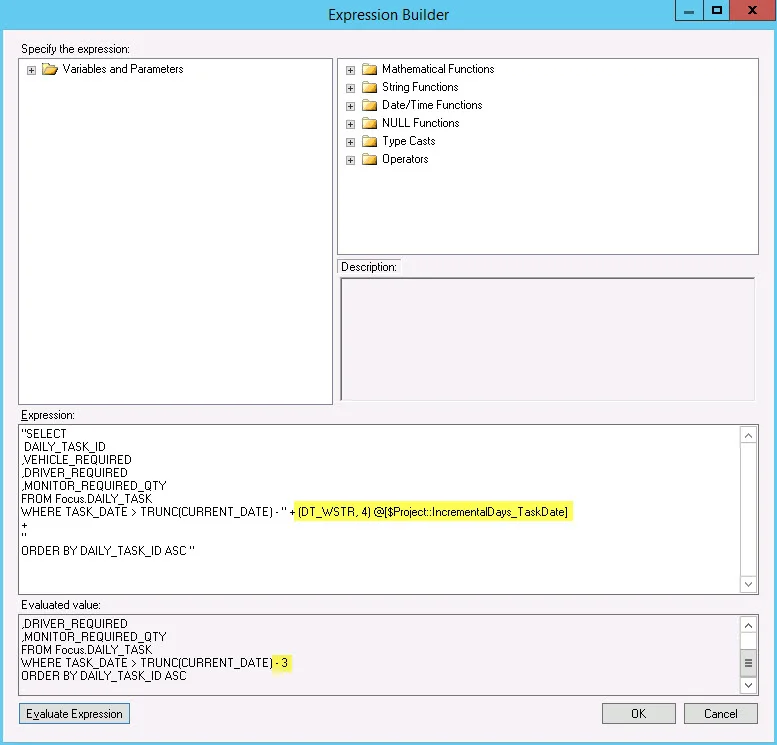
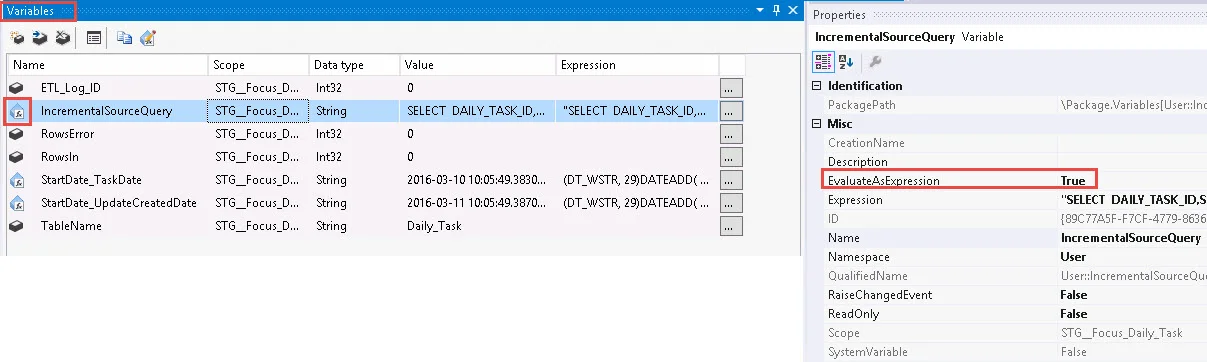
Also, double check the EvaluateAsExpression is set to True in the properties of your variable.

Step 3. Add Attunity Source to Data Flow

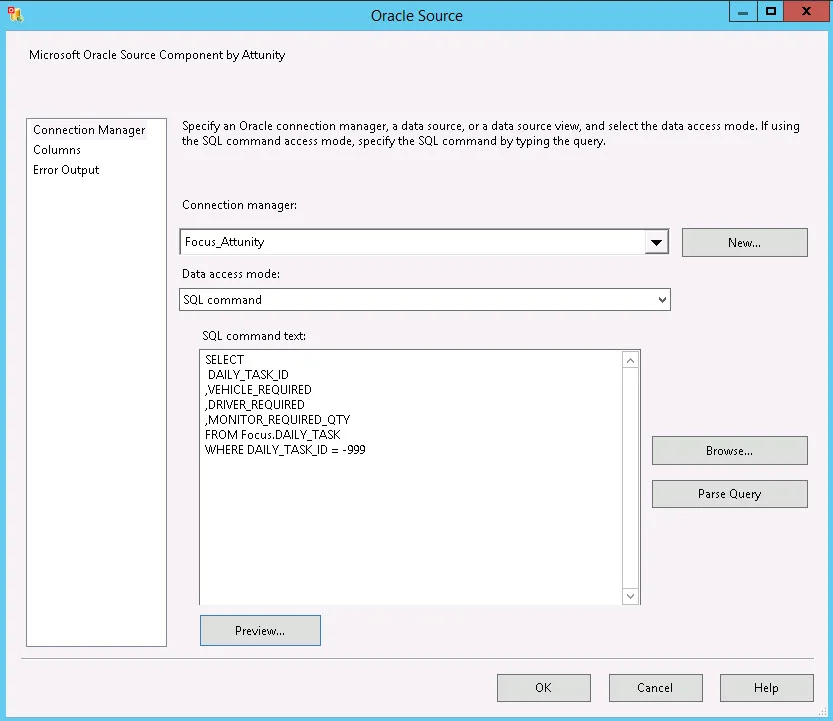
Add the Oracle Source to the data flow. Next we want to change its data access mode to “SQL command” and add a temporary query (with the same columns as the real query) to get the metadata passed to the SSIS package. Based on the where clause I used, I know that no rows will return but that’s ok -- the purpose here is (a) to make sure Table is *not* selected anymore, and (b) to get the column metadata picked up by SSIS. 

This might seem like somewhat a silly step since it includes a temporary query we won’t keep, but things really worked out more smoothly for me when I didn’t try to skip around it. 

Now we have the pieces in place & we just need to connect up our parameterized query in the variable to the Attunity source so that temporary query gets overwritten by the real one.

Step 4. Set Data Flow Expressions

Click anywhere on the Data Flow canvas (i.e., so the context is not on any single object). The Properties pane should contextually show the Data Flow properties.

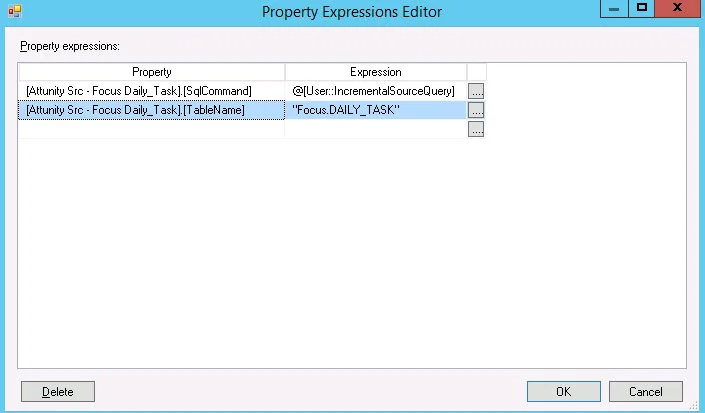
Locate the Expressions section in the properties pane. Click the ellipses next to Expressions.

In the Property Expressions Editor, click the drop-down in the Property. Locate the SqlCommand property for your Attunity source (the first part of the name will differ based on what you named it). Set the expression to be your variable. Be careful not to re-type the SQL statement here or anything – we really just want this expression to be a connector between the SQL command in the Attunity source and the variable that’s parameterized.

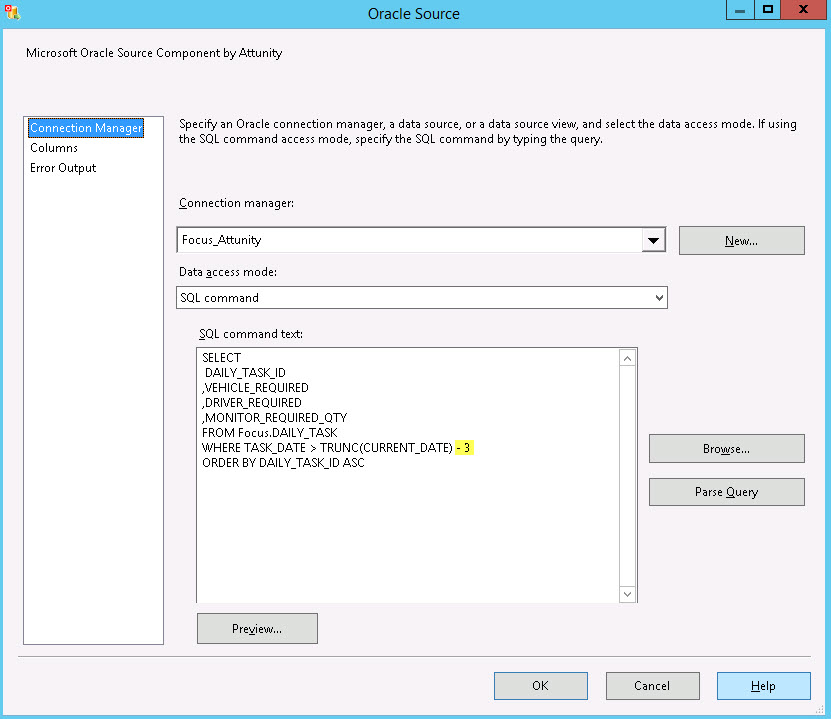
Step 5. Verify SQL Query Changed in the Attunity Source

Now go back to the Attunity Oracle Source and edit it. Your ‘fake’ SQL query from Step 3 should be replaced with the results of the parameterized one. In the screen shot below how we see the 3-day window of time we originally set in the project parameter. You can click Preview if you like as well, to check the query parses and returns a resultset properly.

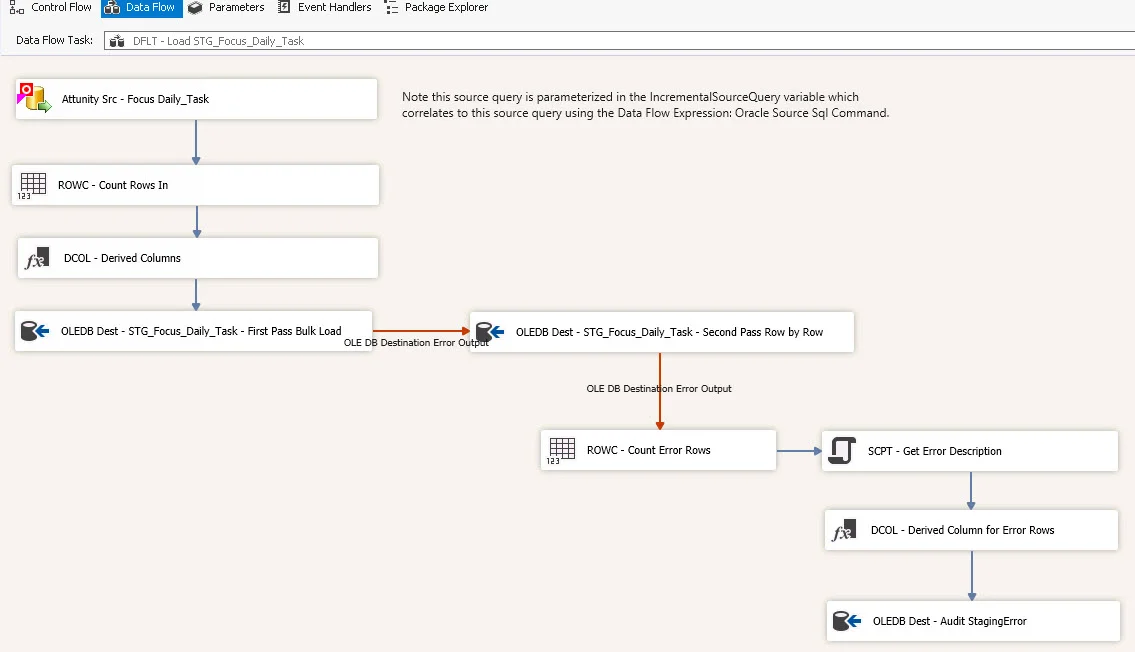
At this point, I recommend putting an annotation next to the Attunity source as a reminder that this is parameterized. It’s a little too easy to forget and just edit the source query directly in the SQL window – which will just be overwritten by the expression thus potentially causing a bit of frustration later.

So that’s it. Now you can continue on and finish the package as you normally would. 

Keeping Up With Changes in Data Warehousing, BI and Analytics

At BlueGranite we work with a lot of different customers and varied environments for delivering data warehousing, business intelligence, and analytics solutions. Keeping current with newer approaches, frameworks, and best practices is an extremely important (and enjoyable!) part of what makes us at BlueGranite very good at what we do. 

Along with my good friend and colleague Javier Guillen, we will be conducting a webinar about "Trends in BI and Analytics." We will be chatting about opportunities, challenges, and what works in these areas:

  • Agility
  • Modern Data Warehousing
  • Self-Service BI
  • Hybrid and Cloud Solutions
  • Advanced Analytics

We hope you can join us for the webinar on March 17 at 1pm EST. More information and registration here: http://www.blue-granite.com/webinars.


Getting Started with SQL Server 2016

If you've been thinking there's a ton of new stuff in SQL Server 2016, then you'd be right. It is huge. Here's a brief recap of each of the most valuable features & enhancements that I wrote up over here: http://www.blue-granite.com/sqlserver.

In terms of some hands-on time to play around in an isolated environment, there's an easy way to become acquainted with the new features.

1. Create an Azure Virtual Machine with SQL Server 2016 Image

Create an Azure virtual machine using the template for CTP 3.3 (Update: now RTM as of 6/1/2016). 

A few things to be aware of in this virtual machine:

  • Integration Services, Analysis Services (MD mode), Reporting Services, Data Quality Services, and Master Data Services are installed and running (though not everything is fully configured, such as SSRS).
  • Local NT service accounts are used for each service. If you plan to use this VM in a completely isolated way then it’s ok. Typically, however, we utilize domain-based service accounts.
 
  • IE Enhanced Security Configuration is on. If you intend to do the next step from within the VM, you'll want to turn it off in Server Manager. (My VM will only be for testing purposes, and will only contain sample data, so I'm less concerned about this than with a normal environment.)
 
  • Both data and log are defaulted to F: drive (which is the only data drive), and TempDB is on the C: drive. Since this is just a temporary environment for learning purposes, for it's ok that it doesn't follow best practices regarding use of physical drives. 
 

Overall, the objective with the VM is to test out features, but not evaluate performance aspects.

When the VM has been created, you can connect to it through RDP session (or from your local SSMS client):


2. Restore Sample Databases

There are AdventureWorks sample databases available which already have some new features implemented such as Always Encrypted, Row Level Security, Dynamic Data Masking, etc. You can find these 2016 sample DBs here: https://www.microsoft.com/en-us/download/details.aspx?id=49502 .

There are three items to be downloaded: Two relational DBs, and a zip file of samples.

SQL2016Samples.jpg
 

Within Management Studio, you want to restore these backup files to the SQL Server instance running in the virtual machine via the GUI or T-SQL, whichever you prefer. 


As an alternative to AdventureWorks, you can download the new Worldwide Importers Inc samples which are available here:  https://github.com/Microsoft/sql-server-samples/releases/tag/wide-world-importers-v0.1.

3. Work with the Samples

Now we’ve arrived at the fun part. The zip file that came with the AdventureWorks samples contains the following samples:

  • Advanced Analytics (R Services)
  • Always Encrypted
  • Data Masking
  • In-Memory Analytics
  • In-Memory OLTP
  • JSON
  • Polybase
  • Query Store
  • Row-Level Security
  • Stretch DB
  • Temporal

The ReadMe.txt file refers you to which file is the starting point within each subfolder:

For example, here’s the items in the Advanced Analytics:

As you can see, the samples are a great way to begin getting familiar with the new features very quickly.

One final comment: Don’t forget to stop your VM when you are finished to avoid incurring charges. You can also use Azure Automation to stop one or more VMs at a scheduled time. I wrote a bit about that here:  How to Stop an Azure VM on a Schedule.


The VM comes with Analysis Services in multidimensional mode installed. If you want to install tabular mode, or another feature, you can find the setup.exe file to run SQL Server setup located at C:\SQLServer_13.0_Full within the VM.

Finding More Information

BlueGranite - Overview of SQL Server 2016 Features

MSDN - SQL Server 2016 Technical Documentation

Updating Metadata in SSIS

This is just a quick tip re: updating metadata in SSIS. A few days ago I was speaking with an SSIS developer who wasn't aware of this change so I thought I'd share it.

Let's say a column is deleted in the underlying table or view that feeds an SSIS package. Or, maybe you're starting with a 'template' SSIS package that has metadata for a different table than the one you are building...once you adjust the source query, you see red X's on the precedence constraints (pipeline paths) in the data flow:

Prior to SQL Server 2012, updating metadata changes of this nature was a very tedious process. It's now *much* easier than it was before. First, you right-click on the precedence constraint and choose Resolve References:


Then you want to check the box on the bottom left (it's not checked by default) then OK. It will then delete the downstream references in the package for the column(s) which no longer exist:


And voila, the references no longer exist for the transformations down below in the data flow. You might have to do this in a couple of places if the data flow splits off (like mine does in the screen shot). Depending on what else changed, you may also need to 'click through' some of the pages of some transformations to update metadata (ex: a data type change), but the Resolve References functionality is a huge time-saver.

My BlueGranite colleague and friend Meagan Longoria has been convincing me recently that these are the kind of changes that BIML is well-equipped to take care of quickly & efficiently when it regenerates a package. I will learn BIML soon (really I will, I will), but in the meantime, Resolve References sure is a handy thing to know. It certainly delighted the SSIS developer I was speaking with last week!

You Might Also Like...

Getting Started with Parameters, Variables & Configurations

Parameterizing Connections and Values at Runtime Using SSIS Environment Variables

Documenting Precedence Constraints in SSIS