
Now that Azure Data Lake Storage Gen2 is now based on Azure Storage as its foundation, we have a new level to incorporate into our planning process the file system itself. The file system contains the files and folders, and is equivalent to a container in Azure Blob Storage which contains blobs. In ADLS Gen1, we didn't have that intermediary level. I talked about this just a bit in #7 of my recent blog entry called 10 Things to Know About Azure Data Lake Storage Gen2 but I'd like to elaborate in this post a bit more about when you might need multiple storage accounts, multiple containers, or multiple file systems to support your data lake.
One caveat: As I’m writing this (March 2019), ADLS Gen2 is young and still evolving in its feature support. This means that some of the blob storage properties mentioned below don’t apply to ADLS Gen2 — yet. According to what we've heard from the ADLS Gen2 team, we can expect that all Azure Storage features will be supported on ADLS Gen2 as it evolves. So, here's the perspective I'm taking in this post:
From the Azure Blob Storage perspective (so that it's less confusing during this transition period of ADLS Gen2)
All properties for all 3 levels are included (even if not yet supported by ADLS Gen2)
Files, Tables, and Queues are disregarded for this discussion (though many of properties we discuss in this post, like the account-level properties, would apply)
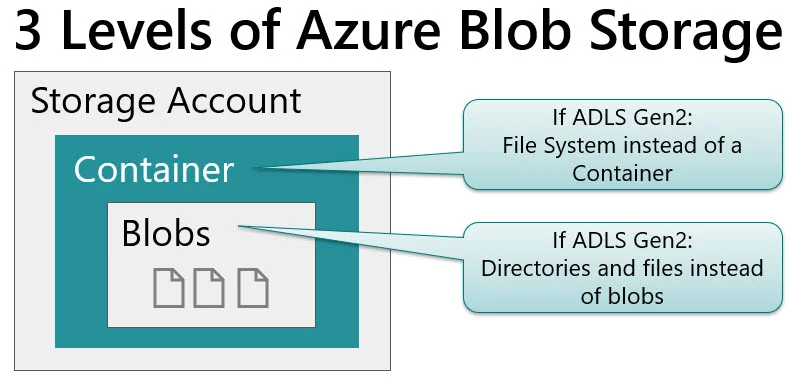
The 3 Levels to Plan for in Azure Storage
The 3 levels within Azure Storage that we’re talking about in this post are (1) the account level, (2) the container or file system level, and (3) the blob or file level:
Azure Storage Account Properties
The storage account has quite a few properties and settings associated with it. Here are the main ones:

A few thoughts regarding the account-level properties:
You may need to consider separate storage accounts if you need to segregate access control (RBAC), virtual networks, access keys, and the like. (Note that RBAC can also be set at the container level too, but ACL type permissions only apply to ADLS Gen2 and not to blob storage.)
If you don’t need the hierarchical namespace whatsoever (for non-analytical use cases), this could mean a separate storage account. The storage cost is the same but transaction costs are higher when the HNS is enabled (discussed in item #8 of this post).
If your data residency requirements differ for certain types of data (ex: one type of data that must reside within Canada, while another must remain in Europe), that will definitely require separate storage accounts.
Settings such as replication (whether it’s locally redundant or geo-redundant) are specified at the storage account level. This impacts not only your disaster recovery planning, but it also impacts cost for the entire storage account.
Your two account keys are at the account level, so be ultra cautious in sharing those out.
Azure Blob Storage Container Properties
The container within the storage account has properties associated with it as well:
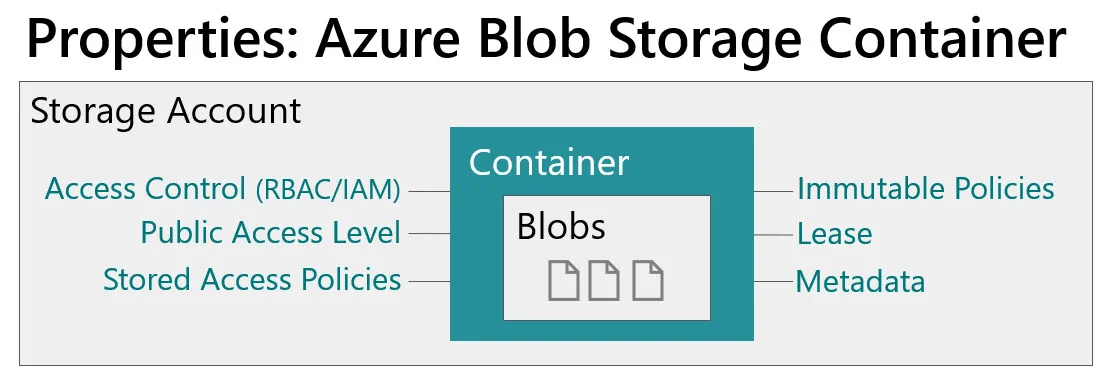
A few considerations related to the container-level properties:
Role-based access control (RBAC/IAM) can be set at the account level or the container level. The container level is the narrowest RBAC scope that can be specified. And don’t forget that RBAC always inherits and can’t be broken: a container inherits from the account, which inherits from the resource group, which inherits from the subscription.
You can set up stored access policies which will make your SAS tokens at the blob/file level utilize the policy (such as an expiration date for access).
My favorite container-level property is the immutable policy. An immutable policy can prevent data being edited or deleted (i.e., it allows appends only once the policy is enabled). If you have very firm requirements for data protection, this might justify separate containers which have different policies in place.
If you have some publicly available data, that access is specified at the container level.
If this is an ADLS Gen2 file system (rather than blob container): Power BI Dataflows will reside in one or more file systems.
Azure Storage Blob (File) Properties
And finally, the files within the container have properties associated with them as well:
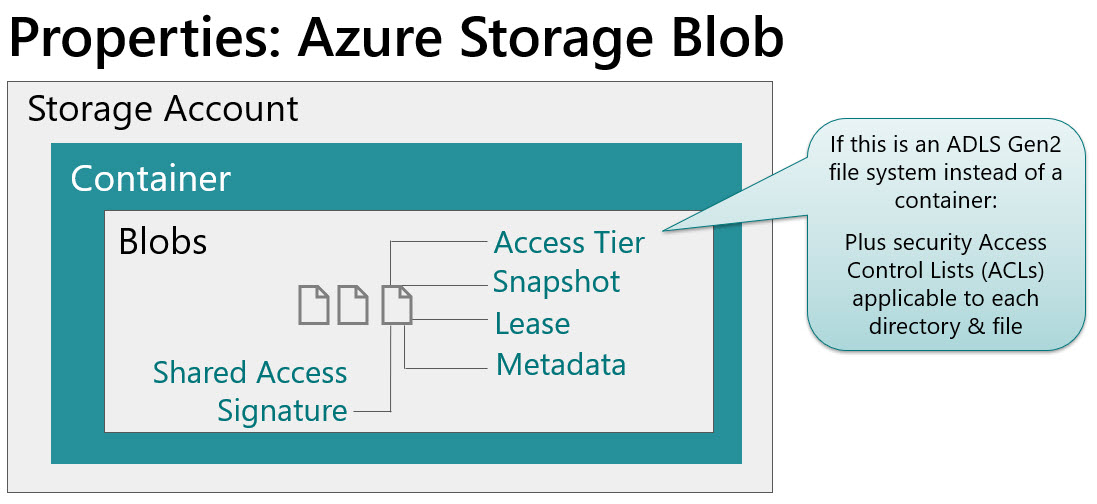
A few things to be aware of regarding the file-level properties:
You can set up a SAS (shared access signature) token if you need to make just one specific file available for access.
If we’re talking about directories and files within ADLS Gen2 instead of blob within a container, then you would also specify data-level security ACLs (access control lists) at this level as well. ACLs apply to directories and files. From a security planning perspective, it’s really important to plan both RBAC and ACLs.
Final Thoughts
My rule of thumb is to start with a consolidated data lake. Separate out into separate storage accounts or containers/file systems only when it’s justified to do so based on your requirements. The more separation that exists, the harder it is for users to find data — so take that into careful consideration. However…it’s ok to be liberal with the separation of your directory structure within the file system itself.
Also, keep in mind that a lot of the RBAC roles are evolving right now with regard to flexibility & granularity of managing the control plane vs. the data plane. Make sure to look into the preview capabilities so you make the best long-term decision.
I hope this is helpful for planning out your data lake / data storage needs.
You Might Also Like…
Granting Permissions in Azure Data Lake Storage
Resources for Learning About Azure Data Lake Storage Gen2
FAQs About Organizing a Data Lake
Zones In A Data Lake
Data Lake Use Cases and Planning Considerations


