Including File Properties and Metadata in a U-SQL Script

When working on big data systems, it can be very helpful to include file properties and other metadata directly within the data results. Capturing data lineage can come in very handy, especially if reconciling or troubleshooting issues (for instance, if retry logic occurred in the data stream and now you have duplicate rows to be handled).

I just learned we have some new U-SQL syntax which supports the following file properties:

  • URI (uniform resource identifier)
  • Modified date
  • Created date
  • Length (file size in bytes)

In the following example, I'm using U-SQL (Azure Data Lake Analytics) to iterate over files which are in date-partitioned subfolders under Raw Data within Azure Data Lake Store. As part of the schema-on-read definition of the source files (aka the extract statement), the new file properties are shown in yellow:

U-SQL_File_Properties.jpg

The output for the virtual columns looks like this:

U-SQL_File_Properties_Output.jpg

You can find more info about this in the release notes on GitHub

Like This Content?

If you are integrating data between Azure services, you might be interested in an all-day session Meagan Longoria and I are presenting at PASS Summit in November. It's called "Designing Modern Data and Analytics Solutions in Azure." Check out info here: http://www.pass.org/summit/2018/Sessions/Details.aspx?sid=78885 

You Might Also Like...

Querying Data in Azure Data Lake Store with Power BI

Granting Permissions in Azure Data Lake

Zones in a Data Lake

Two Ways to Approach Federated Queries with U-SQL and ADLA

Two Ways to Approach Federated Queries with U-SQL and Azure Data Lake Analytics

Did you know there are two ways to do federated queries with Azure Data Lake Analytics (ADLA)? By federated queries, I mean a query that combines (federates) data from multiple sources -- in this case, from within Azure Data Lake and another data store. Federated queries are one aspect of data virtualization which helps us to access data without requiring the physical movement of data or data integration:

FederatedQueries.jpg

The two methods for federated queries with U-SQL and ADLA are:

  1. Schema-less (aka "lazy metadata")
  2. Via a pre-defined schema via an external table

You might be familiar with external tables in SQL Server, Azure SQL Data Warehouse, or APS. In those platforms, external tables work with PolyBase for purposes of querying data where it lives elsewhere, often for the purpose of loading it into the relational database. That same premise exists in Azure Data Lake Analytics as well. However, in the data lake there's two approaches - an external table is still a good idea most of the time but it isn't absolutely required.

Option 1: Schema-Less

Following are the components of making schema-less federated queries work in ADLA:

ADLA_Schemaless.jpg
 

Pros of the schema-less option:

  • Access the data quickly for exploration without requiring an external table to be defined in the ADLA Catalog
  • More closely aligned to a schema-on-read paradigm because of its flexibility 
  • Query flexibility: can retrieve a subset of columns without having to define all the columns

Cons of the schema-less option:

  • Additional "burden" on the data analyst doing the ad hoc querying with U-SQL to always perform the schema-on-read within the query
  • Repeating the same schema-on-read syntax in numerous U-SQL queries, rather than reusing the definition via an external table -- so if the source system table or view changes, it could involve altering numerous U-SQL scripts.
  • Requires a rowset in the U-SQL schema-on-read queries - i.e., cannot do a direct join so this approach involves slightly longer, more complex syntax

Option 2: With a Pre-Defined Schema in an External Table

The following introduces an external table to the picture in order to enforce a schema:

ADLA_SchemaExternalTable.jpg
 

Pros of using an external table:

  • Most efficient on the data analyst doing the ad hoc querying with U-SQL
  • Easier, shorter syntax on the query side because columns and data types have already been predefined in the ADLA Catalog, so a direct join to an external table can be used in the query without having to define a rowset
  • Only one external table to change if a modification does occur to the underlying SQL table

Cons of using an external table:

  • Schema must remain consistent - a downstream U-SQL query will error if a new column is added to the remote source and the external table has not been kept in sync
  • All remote columns must be defined in the external table (not necessarily a big con - but definitely important to know)

In summary, the schema-less approach is most appropriate for initial data exploration because of the freedom and flexibility. An external table is better suited for ongoing, routine queries in which the SQL side is stable and unchanging. Solutions which have been operationalized and promoted to production will typically warrant an external table. 

Want to Know More?

During my all-day workshop, we set up each piece step by step including the the service principal, credential, data source, external table, and so forth so you can see the whole thing in action. The next workshop is in Raleigh, NC on April 13, 2018

You Might Also Like...

Querying Multi-Structured JSON Files with U-SQL

Running U-SQL on a Schedule with Azure Data Factory to Populate Azure Data Lake

Handling Row Headers in U-SQL

Data Lake Use Cases and Planning Considerations

Running U-SQL on a Schedule with Azure Data Factory to Populate Azure Data Lake

This post is a continuation of the blog where I discussed using U-SQL to standardize JSON input files which vary in format from file to file, into a consistent standardized CSV format that's easier to work with downstream. Now let's talk about how to make this happen on a schedule with Azure Data Factory (ADF).

This was all done with Version 1 of ADF. I have not tested this yet with the ADF V2 Preview which was just released.

Prerequisites

  1. Steps 1-4 from my previous post, which includes registering the custom JSON assemblies, creating a database in the Azure Data Lake Catalog, and uploading our raw file so it's ready to use.
  2. An Azure Data Factory service provisioned and ready to use (this post reflects ADF V1), along with some basic knowledge about ADF since I'm not going into ADF details in this post.

Summary of Steps

  1. Create a procedure in the ADL catalog
  2. Test the procedure
  3. Create a service principal (aka AAD App)  [one time setup]
  4. Assign permissions to service principal  [one time setup]
  5. Obtain IDs [one time setup]
  6. Create ADF components
  7. Verify success of ADF job

Step 1: Create a Procedure in the ADLA Catalog Which Will Be Executed By ADF

This ADLA procedure will be executed by Azure Data Factory. Alternatively, you could also reference a U-SQL script in Azure Storage if you prefer storing a script file there (at the time of this writing, we cannot yet store a script file in ADLS). Either way, U-SQL scripts are typically just too long to practically embed in the Azure Data Factory pipeline activity. In addition to what was discussed in the first part of this solution, we want this stored procedure to:

  • Reference 'external' variables which will be populated by the ADF time slices (in our case, the time slice is daily)
  • Apply the ADF time slices to the 'where' predicate
  • Use variables to create a "smart" output file path & name which allows the standardized output partitioning to match the raw data partitioning by year/month/day

Run the following U-SQL (Azure Data Lake Analytics) job:

CREATE PROCEDURE BankingADLDB.dbo.uspCreateStandardizedDataset(@DateSliceStart DateTime, @DateSliceEnd DateTime)
AS
BEGIN

REFERENCE ASSEMBLY BankingADLDB.[Newtonsoft.Json];
REFERENCE ASSEMBLY BankingADLDB.[Microsoft.Analytics.Samples.Formats]; 

USING Microsoft.Analytics.Samples.Formats.Json;

//These external parameters will be populated by ADF based on the time slice being executed.
DECLARE EXTERNAL @DateSliceStart DateTime =System.DateTime.Parse("2017/03/14");
DECLARE EXTERNAL @DateSliceEnd DateTime =System.DateTime.Parse("2017/03/14");

//These are intermediary variables which inherit the time element from the ADF time slice.
DECLARE @YearNbr int = @DateSliceStart.Year;
DECLARE @MonthNbr int = @DateSliceStart.Month;
DECLARE @DayNbr int = @DateSliceStart.Day;

//These are used to align the Year/Month/Day partitioning of the input & output.
//This technique also allows U-SQL to dynamically generate different output file path & name.
DECLARE @YearString string = @YearNbr.ToString();
DECLARE @MonthString string = @MonthNbr.ToString().PadLeft(2, '0');
DECLARE @DayString string = @DayNbr.ToString().PadLeft(2, '0');

DECLARE @InputPath = "/ATMMachineData/RawData/" + @YearString + "/" + @MonthString + "/{filename}.json";

DECLARE @OutputFile string = "/ATMMachineData/StandardizedData/" + @YearString + "/" + @MonthString + "/" + @YearString + @MonthString + @DayString + ".csv";

@RawData = 
EXTRACT 
 [AID] string
,[Timestamp] DateTime
,[Data] string
,date DateTime//virtual column
,filename string//virtual column 
FROM @InputPath
USING new JsonExtractor();

@CreateJSONTuple = 
SELECT 
 [AID] AS AssignedID
,[Timestamp] AS TimestampUtc
,JsonFunctions.JsonTuple([Data]) AS EventData 
FROM @RawData
WHERE [Timestamp] >= @DateSliceStart
AND [Timestamp] <@DateSliceEnd;

@Dataset =
SELECT
AssignedID
,TimestampUtc
,EventData["Val"] ?? "0" AS DataValue
,EventData["PrevVal"] ?? "0" AS PreviousDataValue
,EventData["Descr"] ?? "N/A" AS Description
FROM @CreateJSONTuple;

OUTPUT @Dataset
TO @OutputFile
USING Outputters.Csv(outputHeader:true,quoting:false);

END;


Step 2: Test the ADLA Procedure Works

Before we invoke it with ADF, let's double check our new procedure is working ok. Run the following U-SQL job in ADLA to call the procedure & use 3/14/2017 as the variable values (which matches the timestamp of our original source file):

BankingADLDB.dbo.uspCreateStandardizedDataset(System.DateTime.Parse("2017/03/14"), System.DateTime.Parse("2017/03/15"));

Verify the output is created via Data Explorer. Note the procedure will create the folder structure as well as the file based on the @OutputFile parameter value. After you have confirmed that it worked, go ahead & delete the output file ATMMachineData\StandardizedData\2017\03\20170314.csv so we can be certain later when it's been generated with ADF.

ADLProcOutput.jpg

Step 3: Create a Service Principal For Use by ADF When it Executes U-SQL

You can authenticate using your own credentials in ADF, but they'll expire pretty quick -- so although that technique is fast and easy for testing, personal credentials won't work for ongoing scheduling. Therefore, we'll set this up using a service principal so you get started on the right foot. This is easiest in PowerShell (though you can also do this in the Azure portal if you prefer, in the Azure Active Directory menu > App Registrations page).

#Input Area
$subscriptionName = '<YourSubscriptionNameHere>'
$aadSvcPrinAppDisplayName = 'ADF ReadWrite Access To ADL - Svc Prin - Dev'
$aadSvcPrinAppHomePage = 'http://ADFReadWriteAccessToADLDev'
$aadSvcPrinAppIdentifierUri = 'https://url.com/ADFReadWriteAccessToADLDev'
$aadSvcPrinAppPassword = '<YourComplicatedPWForAppRegistration>' 

#-----------------------------------------

#Manual login into Azure
Login-AzureRmAccount -SubscriptionName $subscriptionName

#-----------------------------------------

#Create Service Principal (App Registration):
$aadSvcPrinApplicationDev = New-AzureRmADApplication `
 -DisplayName $aadSvcPrinAppDisplayName `
 -HomePage $aadSvcPrinAppHomePage `
 -IdentifierUris $aadSvcPrinAppIdentifierUri `
 -Password $aadSvcPrinAppPassword

New-AzureRmADServicePrincipal -ApplicationId $aadSvcPrinApplicationDev.ApplicationId

In AAD, it should look like this:

AADAppRegistration.jpg

I put "Dev" in the suffix of mine because I typically create separate service principals for each environment (Dev, Test, Prod). It's also frequently a good idea to create separate registrations for Read/Write vs. just Read permissions.

Step 4: Assign Permissions to the Service Principal So It Can Read and Write Via the ADF Job

For this step we'll use the portal instead of PowerShell. You can do this piece in PowerShell as well if you prefer using the Set-AzureRmDataLakeStoreItemAclEntry cmdlet - you'll also need to make sure the Azure Data Lake provider is registered. To keep this fast & easy, let's just use the portal.

Security for Azure Data Lake Store

The first piece is referred to as ACLs - access control lists. Go to Data Explorer in ADLS. Make sure you're on the root folder and select Access (or if you want to define permissions at a sub-foldere level only, it's ok to start from that level). Choose Add.

ADLSecurity1.jpg

Select User or Group: choose the ADF service principal we just created. 

Select Permissions: This account needs to read, write, and execute. Note the radio button selections as well so that existing and new child objects will be assigned this permission.

ADLSecurity2.jpg
 

As soon as you hit ok, notice the message at the top of the page. Make sure not to close the blade while it's assigning the permissions to the child objects:

ADLSecurity3.jpg
 

When you see that it's finished (with the green check mark), then it's ok to close the blade:

ADLSecurity4.jpg
 

Security for Azure Data Lake Analytics

The second piece of security needed for our service principal is done over in Azure Data Lake Analytics, so that it's allowed to run U-SQL:

ADLSecurity5.jpg

Note that the equivalent IAM (Identity & Access Mgmt) permissions for our service principal don't need to be assigned over in ADLS - just ADLA. Normally that step would be needed for a regular user though. There's actually a *lot* more to know about security with Azure Data Lake that I'm not going into here. 

Step 5: Obtain IDs Needed for Azure Data Factory

AAD Application ID

Go find the Application ID for your new service principal and copy it so you have it:

AADApplicationID.jpg
 

Tenant ID (aka Directory ID)

Also find your Tenant ID that's associated with Azure Active Directory:

TenantID.jpg
 

Subscription ID

And, lastly, find the Subscription ID where you've provisioned ADL and ADF:

SubscriptionID.jpg
 

Step 6: Create Azure Data Factory Components

The following ADF scripts include two linked services, two datasets, and one pipeline. 

In both linked services you will need to replace several things (as well as the account name and resource group name). Also, be sure NOT to hit the authorize button if you're creating the linked services directly in the portal interface (it's actually a much better idea to use Visual Studio because all of these files can be source-controlled and you can use configuration files to direct deployments to Dev, Test, and Prod which have different values for IDs, keys, etc). You may also want to change the linked services names - mine is called lsBankingADLA (or S) to coincide with what my actual services are called -- but without the Dev, Test, Prod suffix that they have for real (because we need to propagate the linked services without changing the names).

Linked Service for Azure Data Lake Analytics

{
"name": "lsBankingADLA",
"properties": {
"type": "AzureDataLakeAnalytics",
"typeProperties": {
"accountName": "<YourADLAName>",
"dataLakeAnalyticsUri": "azuredatalakeanalytics.net",
"servicePrincipalId": "<YourApplicationIDForTheServicePrincipal>",
"servicePrincipalKey": "<YourComplicatedPWForAppRegistration>",
"tenant": "<YourAADDirectoryID>",
"subscriptionId": "<YourSubscriptionID>",
"resourceGroupName": "<YourResourceGroupWhereADLAResides>"
}
}
}
 

Linked Service for Azure Data Lake Store

{
"name": "lsBankingADLS",
"properties": {
"type": "AzureDataLakeStore",
"typeProperties": {
"dataLakeStoreUri": "adl://<YourADLSName>.azuredatalakestore.net/",
"servicePrincipalId": "<YourApplicationIDForTheServicePrincipal>",
"servicePrincipalKey": "<YourComplicatedPWForAppRegistration>",
"tenant": "<YourAADDirectoryID>",
"subscriptionId": "<YourSubscriptionID>",
"resourceGroupName": "<YourResourceGroupWhereADLSResides>"
}
}
}

Dataset for the Raw JSON Data 

{
"name": "dsBankingADLSRawData",
"properties": {
"published": false,
"type": "AzureDataLakeStore",
"linkedServiceName": "lsBankingADLS",
"typeProperties": {
"fileName": "{year}/{month}/{day}.json",
"folderPath": "ATMMachineData/RawData/",
"format": {
"type": "JsonFormat"
},
"partitionedBy": [
{
"name": "year",
"value": {
"type": "DateTime",
"date": "SliceStart",
"format": "yyyy"
}
},
{
"name": "month",
"value": {
"type": "DateTime",
"date": "SliceStart",
"format": "MM"
}
},
{
"name": "day",
"value": {
"type": "DateTime",
"date": "SliceStart",
"format": "dd"
}
}
]
},
"availability": {
"frequency": "Day",
"interval": 1
},
"external": true,
"policy": {}
}
}

Dataset for the Standardized CSV Data

{
"name": "dsBankingADLSStandardizedData",
"properties": {
"published": false,
"type": "AzureDataLakeStore",
"linkedServiceName": "lsBankingADLS",
"typeProperties": {
"fileName": "SpecifiedInTheUSQLProcedure.csv",
"folderPath": "ATMMachineData/StandardizedData/{year}/{month}",
"format": {
"type": "TextFormat",
"columnDelimiter": ",",
"nullValue": "N/A",
"firstRowAsHeader": true
},
"partitionedBy": [
{
"name": "year",
"value": {
"type": "DateTime",
"date": "SliceStart",
"format": "yyyy"
}
},
{
"name": "month",
"value": {
"type": "DateTime",
"date": "SliceStart",
"format": "MM"
}
}
]
},
"availability": {
"frequency": "Day",
"interval": 1,
"anchorDateTime": "2017-03-14T00:00:00Z"
}
}
}

Pipeline with U-SQL Activity to Run the Procedure in ADLA 

{
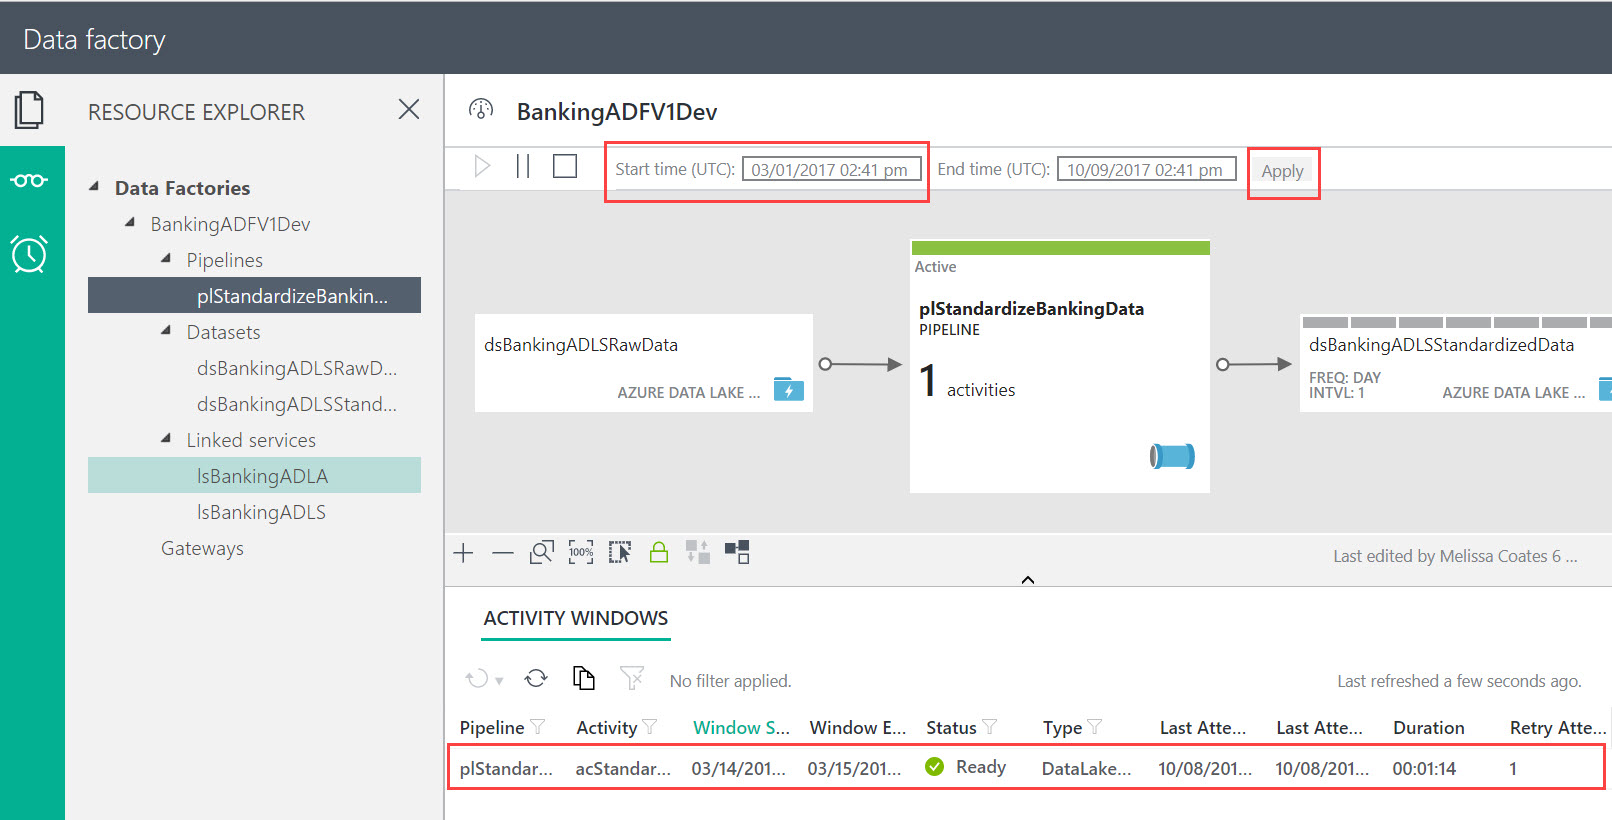
"name": "plStandardizeBankingData",
"properties": {
"description": "Standardize JSON data into CSV, with friendly column names & consistent output for all event types. Creates one output (standardized) file per day.",
"activities": [
{
"type": "DataLakeAnalyticsU-SQL",
"typeProperties": {
"script": "BankingADLDB.dbo.uspCreateStandardizedDataset(System.DateTime.Parse(@DateSliceStart), System.DateTime.Parse(@DateSliceEnd));",
"degreeOfParallelism": 30,
"priority": 100,
"parameters": {
"DateSliceStart": "$$Text.Format('{0:yyyy-MM-ddTHH:mm:ssZ}', SliceStart)",
"DateSliceEnd": "$$Text.Format('{0:yyyy-MM-ddTHH:mm:ssZ}', SliceEnd)"
}
},
"inputs": [
{
"name": "dsBankingADLSRawData"
}
],
"outputs": [
{
"name": "dsBankingADLSStandardizedData"
}
],
"policy": {
"timeout": "06:00:00",
"concurrency": 10,
"executionPriorityOrder": "NewestFirst"
},
"scheduler": {
"frequency": "Day",
"interval": 1,
"anchorDateTime": "2017-03-14T00:00:00Z"
},
"name": "acStandardizeBankingData",
"linkedServiceName": "lsBankingADLA"
}
],
"start": "2017-03-14T00:00:00Z",
"end": "2017-03-15T00:00:00Z",
"isPaused": false,
"pipelineMode": "Scheduled"
}
}

A few comments about the pipeline:

ADFPipeline.jpg

Once all 5 components are deployed, they should look like this:

ADFObjects.jpg
 

Step 7: Verify Success of ADF Job

We can verify the ADF job succeeded by looking at the Monitor & Manage App (note you'll have to set the start time back to March 2017 for it to actually show any activity windows):

ADFM&MApp.jpg

We can also see in the ADLA Job Management area that an ADF job was executed (it very kindly prefixes jobs run by Data Factory with ADF):

ADLAJobManagement.jpg

Whew. That's it. This same technique will continue to work with various files across dates (though I kept it to just one input file to keep this already-super-duper-long-post as straightforward as possible).

Want to Know More?

My next all-day workshop on Architecting a Data Lake is in Raleigh, NC on April 13, 2018

You Might Also Like...

Querying Multi-Structured JSON Files with U-SQL

Handling Row Headers in U-SQL

Data Lake Use Cases and Planning Considerations

Querying Multi-Structured JSON Files with U-SQL in Azure Data Lake

A while back I posted about this same topic using CosmosDB, for handling situations when the data structure varies from file to file. This new post uses the same example data file, but this time we're using U-SQL in Azure Data Lake instead. This technique is important because reporting tools frequently need a standard, predictable structure. In a project I'm currently doing at work, conceptually what is happening is this:

USQLStandardizeFromJSONtoCSV.png

In this scenario, the raw JSON files can differ in format per file, but the output is consistent per file so analytics can be performed on the data much, much easier.

Here is a (highly simplified!) example which shows how I have a PrevVal in one JSON document, but not the other:

DocumentDBSimpleExampleOfVaryingFormat.png
 

Prerequisites

You need to have Azure Data Lake Store and Azure Data Lake Analytics provisioned in Azure.

Summary of Steps

Handling the varying formats in U-SQL involves a few steps if it's the first time you've done this:

  1. Upload custom JSON assemblies  [one time setup]
  2. Create a database   [one time setup]
  3. Register custom JSON assemblies   [one time setup]
  4. Upload JSON file to Azure Data Lake Store [manual step as an example--usually automated]
  5. Run U-SQL script to "standardize" the JSON file(s) into a consistent CSV column/row format

Step 1: Obtain Custom JSON Assemblies

Currently the JSON extractor isn't built-in to Azure Data Lake Analytics, but it is available on GitHub which we need to register ourselves in order to use. There are two assemblies we are concerned with, and they are available from: https://github.com/Azure/usql/tree/master/Examples

To obtain the custom JSON assemblies:

  • Fork the USQL repository from GitHub.
  • In Visual Studio, open the Microsoft.Analytics.Samples.Formats project (under the usql-master\Examples\DataFormats folder).
  • Build the project in Visual Studio.
  • Locate these two DLLs in the bin folder:  Microsoft.Analytics.Samples.Formats.dll -and- Newtonsoft.Json.dll which should be located in <PathYouSelected>\usql-master\Examples\DataFormats\Microsoft.Analytics.Samples.Formats\bin\Debug.
  • Hang onto where these two DLLs are - we'll need them in step 3.
  • Make sure these DLLs are added to your source control project, along with the rest of the U-SQL scripts mentioned in the remainder of this post.

Step 2: Create a Database in Azure Data Lake

We want a new database because we need somewhere to register the assemblies, and using Master for this purpose isn't ideal (though it will work for these two assemblies, I've found it doesn't work for another custom assembly I tried -- so I make a habit of not using Master for any user-defined objects). Also, if you end up with other related objects (like stored procedures or tables), they can also go in this database.

CREATE DATABASE IF NOT EXISTS BankingADLDB;

Mine is called 'BankingADLDB' for two reasons: My demo database is about Banking. And, being the naming convention queen that I am, I prefer having 'ADLDB' as part of the name so it's very clear what type of database this is. 

You'll want to run this as a job in Azure Data Lake Analytics (or from within a Visual Studio U-SQL project if you prefer):

USQLCreateDatabase.png
 

Note I gave the script a relevant job name so if I'm looking in the job history later, the scripts are easy to identify.

To view the database, use the Data Explorer from Azure Data Lake Analytics (rather than the Store):

ADLACatalog.png
 

Step 3: Register Custom JSON Assemblies in Azure Data Lake

Upload your two DLLs from the bin folder to your desired location in Azure Data Lake Store. You'll need to create a folder for them first. I like to use this path: \Assemblies\JSON in ADLS:

JSONCustomAssembliesInADLS.png

Now that the files are somewhere Azure Data Lake Analytics (ADLA) can find, we want to register the assemblies:

USE DATABASE [BankingADLDB];
CREATE ASSEMBLY [Newtonsoft.Json] FROM @"Assemblies/JSON/Newtonsoft.Json.dll";
CREATE ASSEMBLY [Microsoft.Analytics.Samples.Formats] FROM @"Assemblies/JSON/Microsoft.Analytics.Samples.Formats.dll";
USQLRegisterCustomJSONAssemblies.png

Sidenote: Don't forget to specify relevant security on the new Assemblies folder so your users are able to reference the assemblies when needed.

Step 4: Upload JSON File to Azure Data Lake Store

Normally this step would be done in an automated fashion. However, for this post we need to manually get the file into the Data Lake Store. To simulate a realistic scenario, I have shown partitioning of the raw data down to the month level:

ADLSRawData.png

Here is the text for the JSON file contents:

[
 {
 "AID":"Document1",
 "Timestamp":"2017-03-14T20:58:13.3896042Z",
 "Data": {
"Val": 67,
"PrevVal": 50,
"Descr": "ValueA"
 } 
 },
 {
 "AID":"Document2",
 "Timestamp":"2017-03-14T20:04:12.9693345Z",
 "Data": {
"Val": 92,
"Descr": "ValueB"
 }
 }
]

Step 5: Run U-SQL Script to Standardize JSON Data to a Consistent CSV Format

Finally! We're past the setup and arrived at the good part.

I call this "StandardizedData" in my implementation, because I'm really just taking the RawData and changing its format into standardized, consistent, columns and rows. (In my real project, I do have another folder structure for CuratedData where the data is truly enhanced in some way.)

USQLStandardizeJSONtoCSV.png

Here's what the CSV output file looks like in the web preview - each row has a consistent number of columns which was the objective:

USQLOutputFile.png

And, that's it. Very easy to do on an ongoing basis once the initial setup is complete. There's also a multi-level JSON extractor posted to GitHub which I haven't needed to use as of yet. If you have numerous levels of nesting, you will want to look into that extractor. 

One reason this approach works well for me: if a new property should slip into the raw JSON and you don't know about it, as long as you're keeping the raw data indefinitely you can always re-generate the standardized data. In the meantime until the new property is discovered, it won't error out (this isn't always the behavior for every U-SQL extractor but it does work for this JSON extractor).

Here is the full text of the U-SQL script which is copy/paste friendly:

REFERENCE ASSEMBLY BankingADLDB.[Newtonsoft.Json];
REFERENCE ASSEMBLY BankingADLDB.[Microsoft.Analytics.Samples.Formats]; 

USING Microsoft.Analytics.Samples.Formats.Json;

DECLARE @InputPath string = "/ATMMachineData/RawData/{date:yyyy}/{date:MM}/{filename}.json";

DECLARE @OutputFile string = "/ATMMachineData/StandardizedData/LogCapture.csv";

@RawData = 
EXTRACT 
 [AID] string
,[Timestamp] DateTime
,[Data] string
,date DateTime//virtual column
,filename string//virtual column 
FROM @InputPath
USING new JsonExtractor();

@CreateJSONTuple = 
SELECT 
 [AID] AS AssignedID
,[Timestamp] AS TimestampUtc
,JsonFunctions.JsonTuple([Data]) AS EventData 
FROM @RawData;

@Dataset =
SELECT
AssignedID
,TimestampUtc
,EventData["Val"] ?? "0" AS DataValue
,EventData["PrevVal"] ?? "0" AS PreviousDataValue
,EventData["Descr"] ?? "N/A" AS Description
FROM @CreateJSONTuple;

OUTPUT @Dataset
TO @OutputFile
USING Outputters.Csv(outputHeader:true,quoting:true);


Want to Know More?

My next all-day workshop on Architecting a Data Lake is in Raleigh, NC on April 13, 2018

You Might Also Like...

Handling Row Headers in U-SQL

Querying Documents with Different Structures in Azure CosmosDB

Data Lake Use Cases and Planning Considerations